When operating as a VoIP service provider, you will routinely receive rate updates from your partners. Each carrier may send you updates as frequently as several times per week, so you can expect to need to work on uploading new rates daily in order to keep your rating and routing consistent. Obviously, you want to be able to upload the files you receive and let the system process them automatically, instead of entering each rate manually.
Upload rate data into a tariff
Unfortunately, each carrier uses a different format for rate presentation: some use CSV files, while others use Microsoft Excel format; the layout of columns in these files usually varies; some carriers will provide phone numbers in E.164 format, while others will provide them in the local dialing format. If you were to process the data in each file individually so as to convert it into a format acceptable to your system, it would require a fair amount of manual processing each day, and might result in data errors.
PortaBilling offers the ability to program data processing rules (called templates) for each type of rate file you receive, so that you can eliminate the need for any manual data conversion and save yourself a lot of time. Also, the rate upload process is interactive and provides a comparison between new rates and existing ones, so that you can review the rates being uploaded for validity and accuracy. You can upload rates in .csv, .xls and .xlsx formats.
Let’s have a look at how a rate import is performed. We will perform the rate upload for the “X-Telecom” termination tariff, proceeding step by step. You can then use this as a model for uploading any other tariffs.
Start the import
- On the Tariff list panel, click the tariff name.
- On the Tariff panel, click the Rate upload button. You will see a page like the one below:
Let’s now discuss the available options and their effect.
Add or replace rates
This option controls behavior in respect to rates which were already defined in the tariff at the time of import. The default is to add new rates into the tariff. So when the new rates appear, and there is an existing rate for a certain prefix, the new rate will simply override the old one. If a rate for a certain prefix is in the tariff but is not given in the file you received from the carrier, it will stay unchanged. This mode is frequently used, since most of the time your partners will send you rate updates only, i.e. the file will contain only a small subset of prefixes for which the price has changed.
In some cases, however, you need to ensure following import that the tariff structure matches the provided file exactly, so that there are no “old” rates remaining. This is normally done when your carrier changes the structure of the prefixes and sends you a “replacement” rate update. In this case, you will want to use replace mode, which uploads all the new rates and then marks rates for all prefixes not present in the uploaded file as discontinued.
In our example, we assume that a normal, “incremental” rate import is being used; thus we will be adding rates.
Effective from
PortaBilling allows each rate to be assigned an “effective from” date, so that an automated rate change can be easily scheduled for the future. Thus if your carrier sends you a file which indicates the date when a specific rate becomes effective, this can be extracted from the file and added to the rate information in PortaBilling. Sometimes it may happen, though, that you receive the file later than expected, when the moment at which the rate was supposed to become effective has already passed. In order to protect data integrity, it is impossible to upload the rate and assign an “effective from” date in the past, since CDRs for calls previously made will have already been rated according to the old rate and stored in the database (see the xDR rerating topic for more information about how this situation can be resolved). Consequently, you have the choice to either skip these rates or upload them as effective immediately. This can be adjusted by using the Rates with ‘effective from’ date from the past should be uploaded as effective immediately check box.
Skip duplicate rates
Sometimes carriers will include all prefixes in a rate update file, even if for some of them no change in pricing has occurred. If you upload the whole rate file, it will create duplicate rate rows. This has no effect on the way calls are billed, but it will increase the amount of entries in the rate table and, in the long run (if it occurs continually), have a negative effect on performance.
In order to prevent this, simply activate the option to skip duplicate rates. This will slightly increase the time it takes to upload the whole rate file (since PortaBilling will have to check the already existing rates and compare them with the new ones). If rate parameters such as price, preference, and so on turn out to be identical, no extra (excess) rate will be inserted. We use this mode in our example (and certainly recommend using it whenever possible).
Finally, choose the rate file and click Next. The file is uploaded to the server, and we move on to the next step.
Review file parsing
The purpose of this screen is to verify that the general structure of the file has been determined correctly, so that the data can be properly extracted. There are different ways to organize data files: for instance, CSV files, despite their name (comma-separated values) can use semi-colons or other characters as a separator. PortaBilling attempts to make a best guess, but it is important to review the results and, if necessary, change the settings according to your preference.
Multiple prefixes in the same cell
Typically one row in the table contains the rate information for a single phone prefix (destination) such as 447 or 447527. Sometimes you may receive a file from the vendor where multiple prefixes are placed in the same table cell as shown in the screenshot below.
You can easily process such files – you just need to specify which character (e.g., comma (,), semicolon (;) or something else) will be used to separate the individual prefixes in the Delimiter For Multiple Destinations field. This way, during the upload, the system will treat each occurrence as if there is a separate row in the table for each prefix.
In our case, it looks as if the file was parsed properly, so we can click Next and move on to the next step
Review data fields definition
This is a very important step, since we need to identify where individual data elements (e.g., destination prefix or price) are located in the file, and map them to the attributes (data fields) for the rate. You can imagine what would happen if the system were to confuse them.
PortaBilling applies some artificial intelligence, and usually guesses quite well where the specific columns are; but, obviously, you need to check whether the data fields have been assigned to the proper columns, and adjust them if necessary.
On the right you see the Available Fields select menu, which represents all the attributes of the rate record. You can drag and drop fields from here to the table headers in order to associate a particular data field with a column. A blue label will then remain at the top of the column, signaling that the values in this column (e.g., column A) will be used for the specified rate data field (e.g., Destination). Also, the data field in the list will be highlighted – this allows you to quickly see which data fields are already assigned.
You can also drag a label to a different column (thus associating the data field with a different column) or back to the Available Fields menu (the data field will then not receive any input values from the file).
The Format select menu allows you to adjust the way PortaBilling interprets the values in the table cells, e.g., whether a leading 00 should be stripped off or considered part of the phone prefix, or whether a comma (,) or a dot (.) should be considered as a decimal separator for numbers.
Finally, you have the post-processing rule. Here you can write a mini-program in Perl which will alter the original value, e.g., append or remove characters, increase or decrease numeric values. It can also perform advanced operations, e.g., look up the current exchange rate for the vendor’s currency and convert the value into the currency you use.
What if the file does not contain a value for a certain data field?
This is another common situation: the carrier may not have included some important information (e.g., rounding intervals) in the file, or it could be that you simply need to assign the value based on your own decision (e.g., when uploading rates from carrier ABC, you will mark them as the Cheap route category). In this case, you may leave the data field unassigned to any column in the file, and simply type a value in the Default Value field.
What if you need to associate a single column with more than one data field?
For instance, the carrier only supports a single “rounding interval” rating parameter, and so they provide a single column only (column D, in our example). In PortaBilling, however, you have First Interval and Next Interval. In this case, you will associate one data field with the column, and then click on the other data field and link it to the first one (select the first field name in the Link With menu).
What if you want to “preserve” some of the already assigned rate attributes?
Quite often you will initially upload all the rates from a given carrier with a default preference (e.g., 5) or route category (e.g., Default). After that, you start to fine-tune your routing based on quality reports, testing, customer feedback, and so on. Let’s assume that, in this particular vendor’s tariff, the preference for prefix 44 was changed to 8 (to reflect the fact that this is our preferred vendor for this destination) and the preference for prefix 447 was changed to 3 (here we actually decided to move the vendor to the bottom of the routing list for this particular destination). Now, if we were to simply upload the rate file, it would assign the default value (5) for preference to all the new rates, and our subsequent routing adjustments will be lost.
To prevent this, you may specify that the default value should only be applied if there are no existing rates for this prefix in the tariff.
Thus the parameter value from the existing rate will be copied into the new one, so that the new rate for 44 will retain preference 8, and the rate for 447 – preference 3.
 TIP: In PortaBilling you configure the rate information using two
parameters: the price for the first interval (First Price) and the price for subsequent intervals (Next Price). Most of the wholesale
carriers do the rating using only one parameter: price per minute. So when
importing such a file into PortaBilling you would need to assign the First Price data field to the column
that contains the price and then link the Next
Price to it. Since it is a very common operation, for your convenience the
rate import wizard contains a special data field: Price. If this “virtual” data field is assigned to a column, then
the value found there will be used for both First Price and Next Price
rate parameters.
Ready to move forward?
The Destination Description field is not required for the actual rate import, but it will be very useful later on if there are any new destinations created.
 TIP: In order for the destination
description to be automatically
filled in it is needed to create a “Destination
Description” column and fill in some descriptive information in the file
before the upload procedure.
Click Next to proceed.
Review rate information
The rate import wizard will process the rate data according to the rules previously specified and present the results on the screen for review before storing them in the database.
The Status column shows the comparison between the current rate and the new rate in the PortaBilling file so you can quickly understand exactly how the rate will change. A red arrow indicates a price increase (this destination is more expensive) and a green arrow indicates a price decrease (making it cheaper to call that destination).
The Off-Peak Period column shows the off-peak period defined for the rate via the tariff configuration. You can change the off-peak period for a particular rate by selecting a previously defined off-peak period from the list.
In the Price field you can see the actual price differences for updated rates. Also, if you negotiated a special last-minute rate change with the carrier, you can edit the rate data right in this field – just double-click on a specific cell in the table and enter a new value.
The duplicate rates (i.e. the rates that have exactly the same parameters as already existing ones in the database) are highlighted as inactive and therefore appear grey.
If you do
wish to add an inactive rate, it is necessary to manually activate it. Click on
the  icon at the end of the row to activate the
rate. When activated, the rate color will change to black.
You can also change the values for the Payback Rate, Forbidden, Hidden, or Discontinued fields:
- Payback Rate – this means that the customer is credited for using certain services, rather than paying for them (e.g., the service provider receives the termination fee for his own subscribers and wants to encourage his users to receive more calls by passing on a certain portion of these savings).
- Hidden – this means that the rate is excessive (e.g., there are usually more than 500 rates for Argentina mobile because of different prefixes). This flag does not affect usage of the rate by the billing engine. It simply indicates that this rate may be omitted when making a list of rates for the end user.
- Discontinued – this means that the rate will stop being active immediately or from the specified time-stamped date. To deactivate the rate in the future, specify a certain date and time in the Effective From field.
- Forbidden – this means that no calls are authorized for this particular destination.
Click Next in order to proceed.
Managing new prefixes
This page only appears if the rate file contains any prefixes you haven’t yet defined in your system and it allows you to add new prefixes quickly and efficiently. This process takes a very little time and reduces the chances for error.
Carriers frequently send rate files containing prefixes that have not yet been defined in your system. These prefixes must be added into the system in order for rates to be created for them – so the big questions are: ‘how will this affect the routing and billing on your system in general?’ and ‘how will other carriers and customers be affected?’
When adding a new destination, extra parameters may be provided in addition to the actual prefix – see below.
Assigning the country
Each destination is associated with a country. For a new destination the association has to be made before it can be inserted into the database. It is a good idea to upload the default set of destinations provided with PortaBilling, or some other set that contains, at the least, destinations for each country, e.g., United Kingdom – 44, Germany – 49, etc. Then PortaBilling can correctly assign the country name to the majority of new prefixes. Thus you do not need to choose the country for each destination manually (e.g., if you try to upload a destination 33040, but there is already a more generic one 33 in the system and the country has been defined as France – the upload wizard will propose assigning the number 33040 to France as well). If required, a country for the new destination may be chosen from the drop-down list on the Create New Destinations page.
Sadly, both the US & Canada pose the biggest challenges, since they (plus a handful of other countries, like Bermuda) share the prefix 1. This makes it impossible to guess the country code just by looking at the phone number. For instance, 1204 is Manitoba, Canada and 1205 is Alabama, US! In these cases you will need to manually assign country codes for these destinations. The good news is that new area codes for the US & Canada do not appear that often.
In our example we will assign the 670 destination to the country East Timor.
Including a destination into a destination group
Destination groups are invaluable for saving hours of time and for avoiding mistakes, since one can change the rate for a whole group with just a single click instead of modifying rates for many destinations (and many could literally mean thousands), manually. So for instance, when the new destination 4473 is being added – it may be a good idea to immediately include it into a destination group (within the destination group set that’s associated with this tariff) – UK-Mobile in this case. Then the next time someone updates the UK-Mobile rate, the change will be applied to this prefix as well. See the screenshots below for the sequence of actions.
In some cases it may also be beneficial to include this destination into groups that are in other destination group sets. In our example, the new destination 4473 (UK-Mobile-Vodafone) is detected while uploading rates into the tariff of carrier X-Telecom (which has the X-Telecom destination group set associated with it). You may want to immediately add it into the UK-Mobile destination group in the Retail-Customers destination group set. This way the next time your colleague is generating rates to be applied to your customers – this prefix will appear and he can apply the special pricing for it.
Multiple similar destinations
In our example you may notice that there are several destinations (55123, 55124, 55125, etc.) which look very similar. That’s because they belong to the same country (Brazil) and they are in the same destination group (Brazil-Mobile).
In order to save time and avoid assigning parameters to each one of them manually, you can do the following: assign the required parameters to just one of them, select the others using the checkbox on the left side of each row and then move the mouse over to the rows that don’t have parameters assigned. A popup menu will appear – choose Apply to Selected and this will automatically change all the rows.
Please see how the change is applied to several prefixes for Brazil below.
 TIP: You can filter the list of new destinations by country or hide
the destinations that have already been assigned a country or destination
group. For this action, use the Select
All button in conjunction with Apply
To Selected to quickly apply
settings to hundreds of destinations.
If I add a new destination while uploading rates for carrier ABC will it affect my other carriers?
Customers who are used to old-style routing systems are very concerned about adding new prefixes, since on many of those, a carrier with a longer prefixes in their tariff would all of a sudden get priority routing (although it is not the cheapest or the one with better quality). Attempts to “harmonize” the prefixes (to ensure that all carriers use the same prefix set) require lots of manual labor and are Sisyphean in scope: the moment you finish changing the prefixes and things are finally looking good, one of the carriers sends you an updated prefix list and you have to start the task all over again.
This is not the case with PortaBilling, which uses a true real-time routing engine giving each carrier their own set of prefixes for the tariff. When the routing is calculated, available routes are compared based on cost, preference and route category – never on the prefix length. So if you upload the rate for 4471 for carrier A (and other carriers only have prefixes 44 and 447) – when a routing for a call to 4471234567 is computed, the 4471 rate will be compared by price and preference with the rates for 44 or 447 from other carriers (who don’t have the 4471 prefix). Consequently, the system always produces a correct routing and you don’t have to worry about adding new prefixes that are only used by a few carriers.
I do not want to add a destination right now, what do I do?
You can delete
the destination from the list of destinations that will be automatically
created during the import by using the  Delete
button. Note that in this case, the rate for this destination will not be
imported (since there is no destination to associate it with). To undo the
delete destination action, click the
  Add
button, respectively.
Summary
On the Summary page, you will see an overview of information about the number of rate records to be processed. You can also specify a name under which the current import settings will be saved as a template. Later you can re-use them when uploading rates into this or other tariffs.
You may specify who should receive a report about the rates being uploaded, and then click Start Import to launch the rate import process.
The report will contain following information:
- Total rates processed – the total number of rates in the imported file.
- Total rates created – the total number of rates created including the newly created rates (the rates which were not present in the tariff prior to the import) and the overwritten ones.
- Old rates overridden – reflects the total number of rates, which were updated (i.e. the previous rates were replaced by the new ones for some destination).
- Skipped (due to errors) – the number of rates that contained errors (e.g., a typo in the price column) and therefore were not added to the tariff. The information about the occurred errors you can see in the e-mail with the tariff upload report.
- Skipped (duplicates) – the number of skipped duplicate rates. It means that if some rates (rate parameters) in the uploaded file were identical with the ones already present in the tariff, the system skipped the duplicates i.e., no extra (excess) rate were inserted into the tariff.
- Rates for destinations, previously absent in this tariff, created – the number of rates created for destinations which were not in the tariff prior to the import.
- Destinations, previously absent in the system, created – the number of new destinations created in the system (billing environment).
In the attached file you can see the detailed information about the result of the rate upload procedure in order to quickly understand exactly how the existent rates were changed. You can also see information about new rates added if there are any. See the example of the file on the screenshot below:
How to…
… upload tariff rates with country code and area codes in separate columns
Sometimes vendors may send you tariffs in a format with country codes and area codes in separate columns. To upload rates in this format, there is no need to edit manually .xls files in order to merge these two columns into one beforehand.
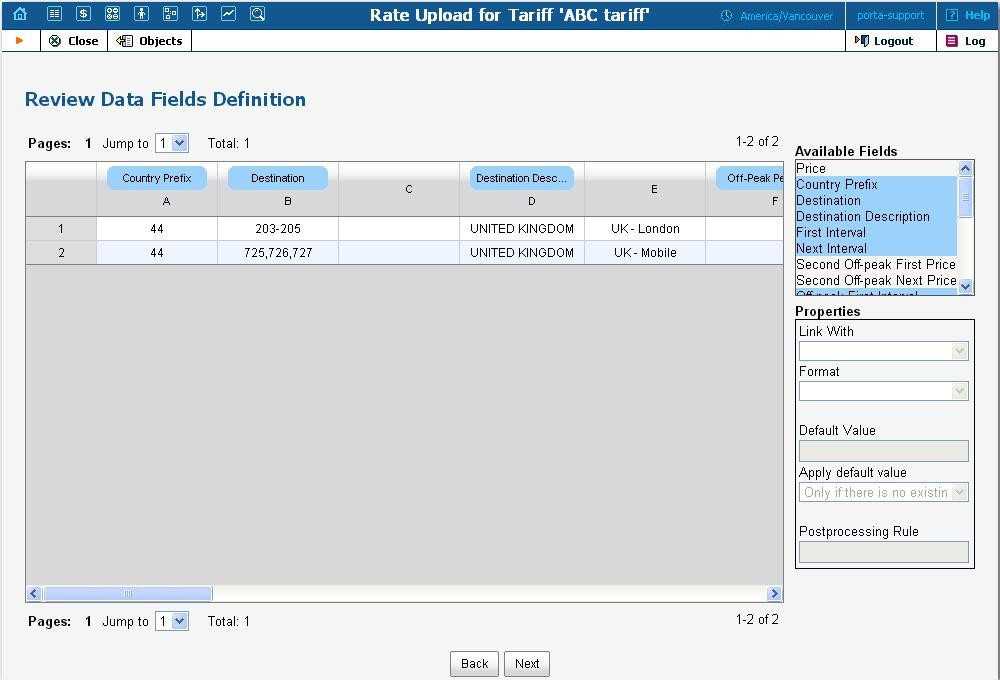
You can upload rates with country code and area codes that are in separate columns. During the upload, the value of the Country Prefix column will join each destination value of the Destination column. For area codes, you can use comma-separated values or the values separated by dashes (see an example below). The .xls file, in this case, should look like the following:
During upload on the Review Data Fields Definition page, assign the Country Prefix data field to the column with country codes and the Destination data field to the column containing area codes.
The result of performing the above-mentioned actions should look like the following:
Go to the PortaBilling web interface to see the uploaded rates to the tariff:
… upload US inter-/intra- state rates
Make sure you have enabled US Inter/Intra State rates as described in the Billing for US Inter/Intra State Calls handbook prior to importing the rates to the tariff.
You may also specify whether the destination pertains to this category before the rate upload. Simply specify “_USInterIntraState_” in the Off-peak Period field. For interstate rates specify the price in the First Price and Next Price fields; for intrastate – in the Second Off-peak First Price and Second Off-peak Next Price fields. During the upload, the system will automatically recognize the destinations marked as inter/intra state, and appropriate rates will be applied.
After successfully configuring the inter/intra state rates for calls between different states the interstate price will be used. For calls within the state, the intrastate price will be used.
Note that setting peak/off-peak prices is not supported for the US Inter/Intra State rates.
… upload within/outside EEA rates
To enable within/outside EEA rates follow these steps:
- Go to the Configuration server and clone the existing configuration.
- From the Configuration Tree choose BillingEngine.
- In the Groups section select the ZoneRating group.
- Select Yes under the EEA_Enabled option.
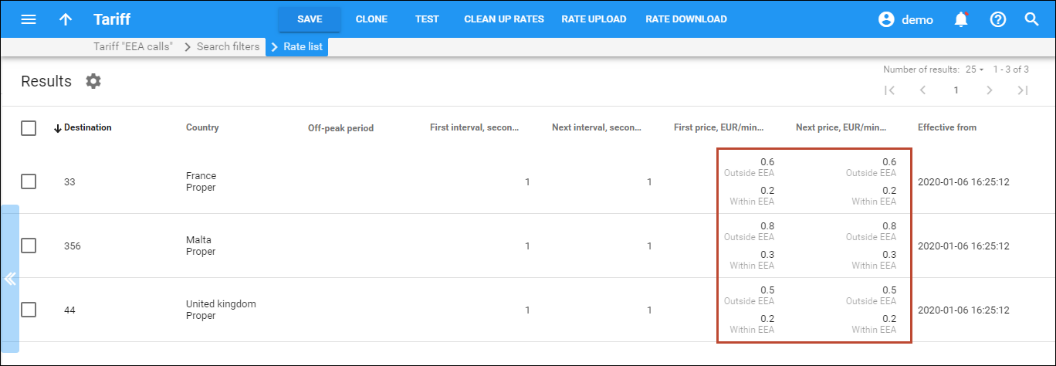
To upload rates for calls within/outside the European Economic Area (EEA) the ZoneRating module is used. Specify “_ZoneRating_” value in the Off-peak Period field in your .csv file. For Outside EEA rates specify the price in the First Price and Next Price fields; for Within EEA – in the Second Off-peak First Price and Second Off-peak Next Price fields.
Note that you can use separate rates for calls within/outside EEA only for peak periods. Peak/off-peak pricing is not supported.
After the rates for calls within/outside the EEA are uploaded and configured, PortaBilling checks whether the CLI belongs to any of the EEA countries for each call to a European destination. If the CLI belongs to the EEA countries – the price for calls within EEA is used. If the CLI does not belong to any of the EEA countries, the price for calls outside EEA is used.
… upload tariff rates in E.212 format
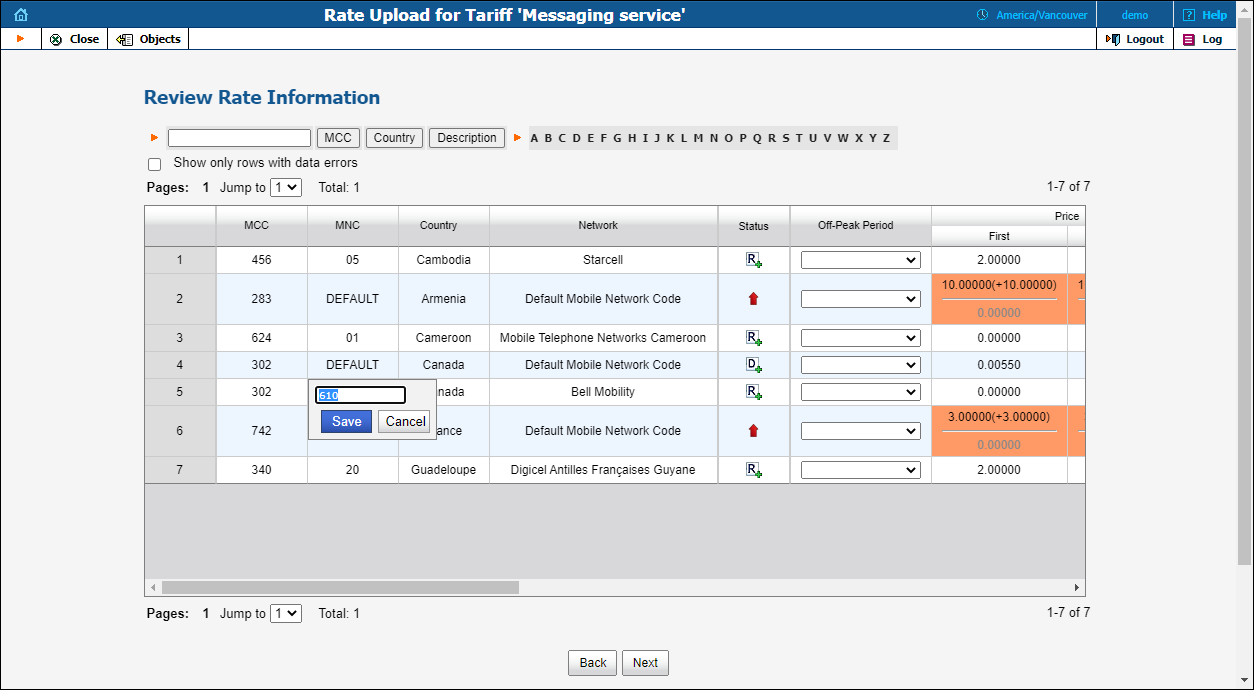
Typically your SMS providers send you rates for destinations defined in the E.212 format. This is a format used in mobile networks and it defines destinations as combinations of mobile country codes (MCC) and mobile network codes (MNC).
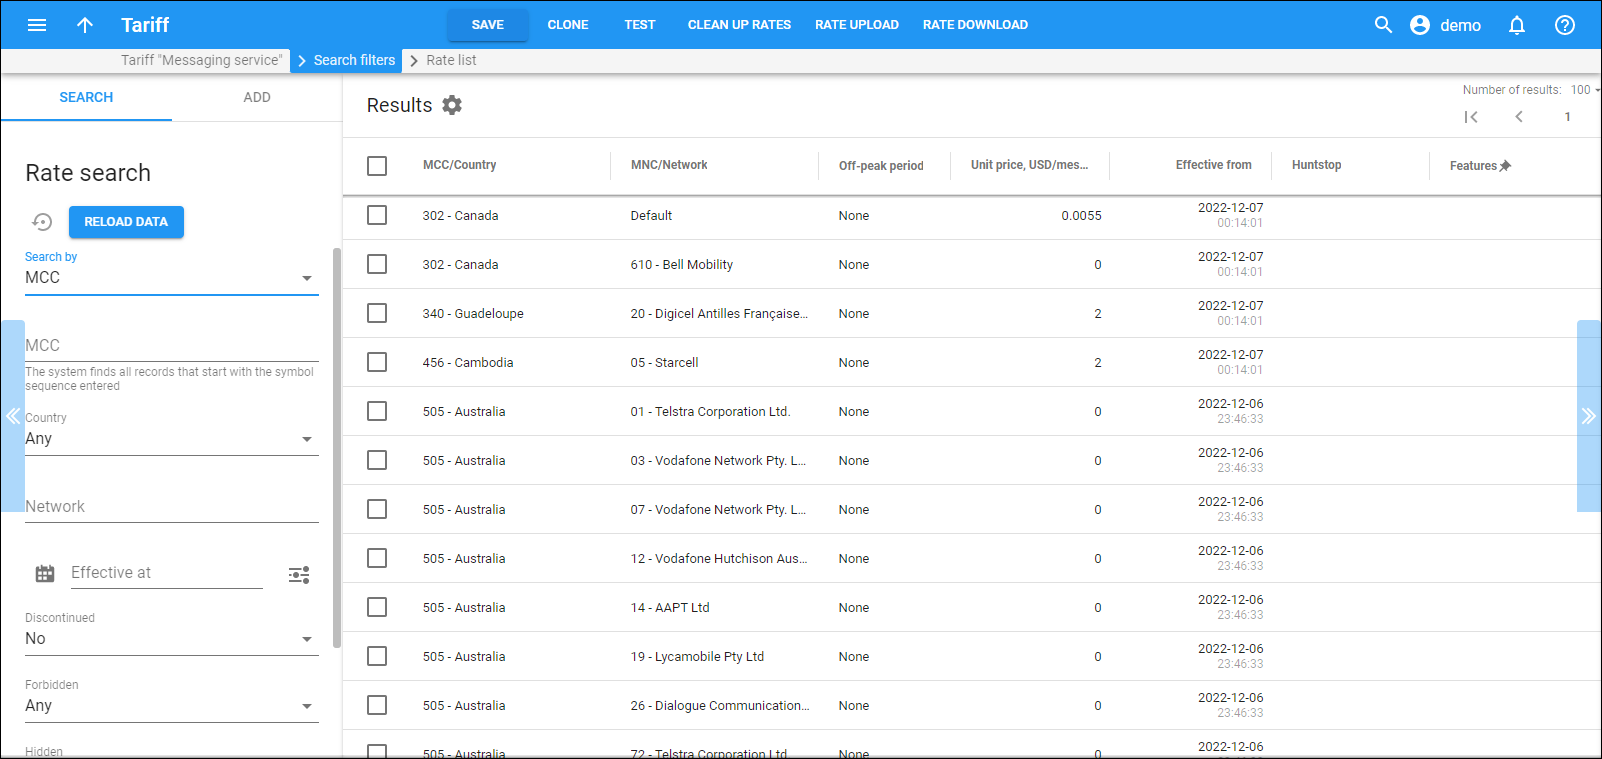
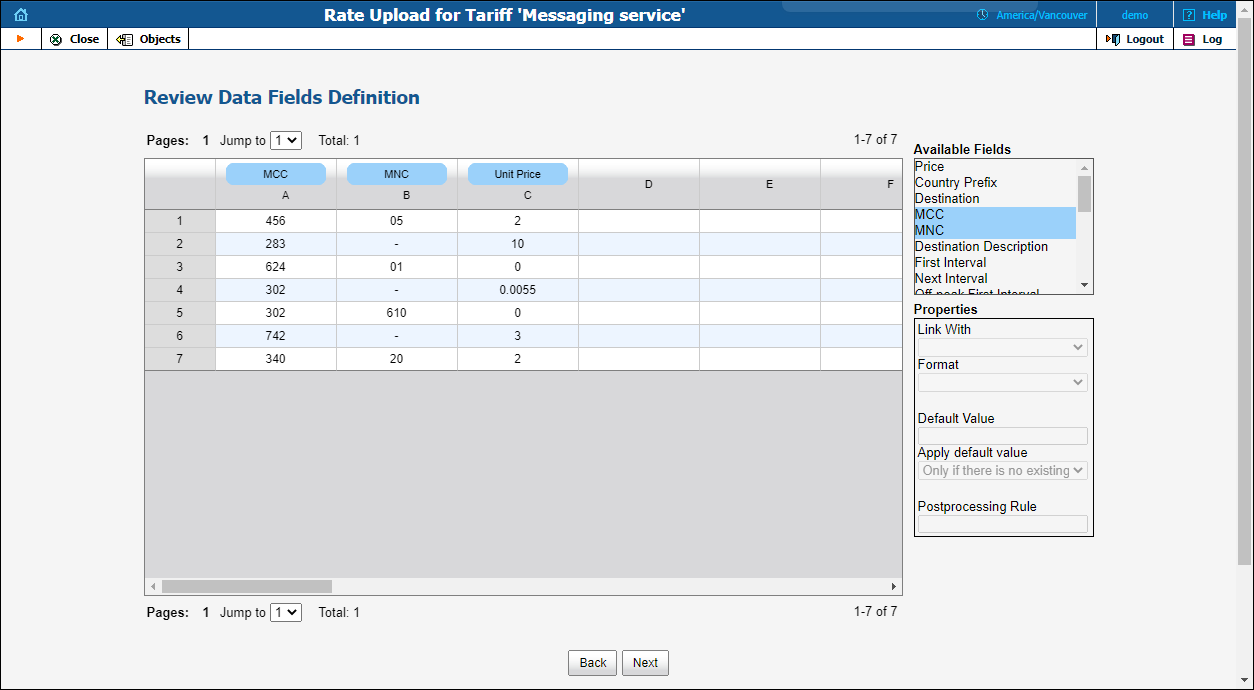
PortaBilling can upload rates in the E.212 format as easily and effectively as it does with the E.164 rates. The upload procedure is very similar. The only difference is that the rate upload in E.212 is based on MCC, MNC, and Unit Price data parameters. Therefore, verify that PortaBilling assigns MCC, MNC, and Unit Price column headers to the appropriate columns and adjust them if necessary.
Make changes to MCC, MNC, or Unit Price:
The result of the rate upload looks like the following:
Go to the PortaBilling web interface to see the uploaded rates to the tariff:
