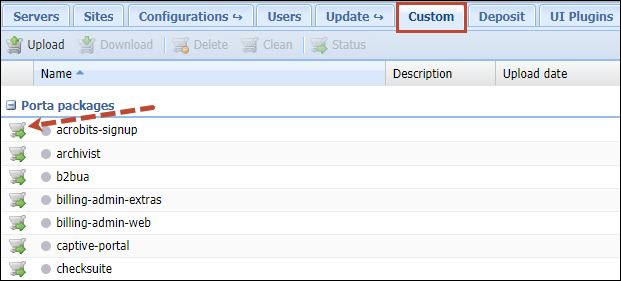
This tab allows you to manage custom software and patches on your servers. When entering this tab you see the list of RPM packages. It is divided into two groups:
- Porta packages – list of all PortaOne RPM packages
- Third-party packages – already installed third-party RPM packages
An indicator on the left of the package name shows whether it contains patches (green light), does not contain patches (grey light), or cannot contain patches (red light).
The Custom tab includes the following actions:
|
Field |
Description |
|---|---|
|
Upload |
Uploads new third-party RPM package. |
|
Download |
Downloads third-party RPM package from the server. |
|
Delete |
Removes selected RPM package from the repository. This option is only active for third-party RPM packages. |
|
Clean |
Removes all patches from the selected RPM package. |
|
Status |
Shows status and version of RPM package on all servers within the installation. |
If a PortaOne RPM package is patched, its name appears bold in the list.
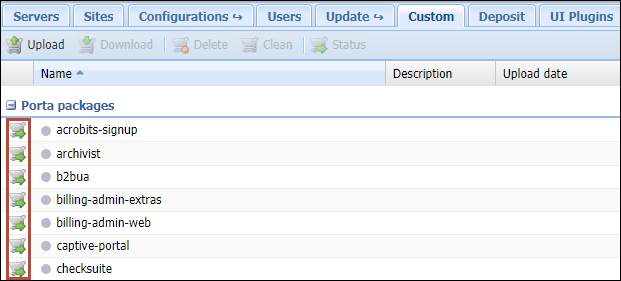
When clicking the ![]() icon on the left of the desired package, the Patches block opens. This block will contain the list of all patches if they are already uploaded for a particular RPM package.
icon on the left of the desired package, the Patches block opens. This block will contain the list of all patches if they are already uploaded for a particular RPM package.
A patch can have one of three kinds of status:
The Patches block includes the following actions:
|
Field |
Description |
|---|---|
|
Upload |
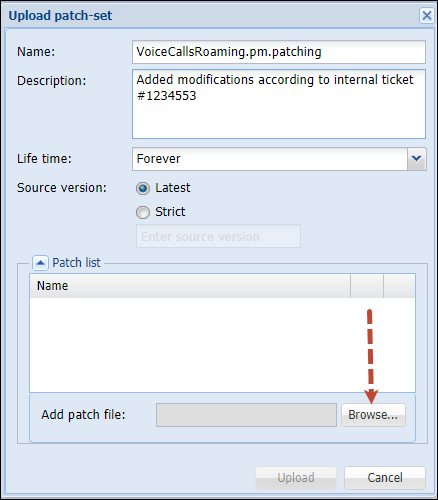
Uploads a new patch file. You will see a pop-up window where you should choose the file to upload, enter a description and specify a Lifetime and Source code for a patch. |
|
Download |
Downloads a patch from the server. |
|
Build |
Rebuilds the selected RPM package with the uploaded patch included. Note that changes won’t become effective immediately – the patched RPM must be installed to take effect. For more information see the Patch upload section below. |
|
Delete |
Removes the patch from the list. It is prohibited to delete a patch while in an "Applied" state. To remove it, clean the patched RPM package first.
|
|
Clean |
Removes selected patch from the RPM package or resets error status. Note that changes won’t become effective immediately – the patched RPM must be uninstalled for the original RPM to take effect. For more information, see the Patch upload section below. |
Patch’s lifetime
Every uploaded patch has a lifetime parameter. This means the "finish date" for an RPM package or patch propagation.
Why specify a lifetime for a patch
When you modify a PortaOne package, you are actually applying patches on top of an underlying PortaOne code. Since PortaOne developers always work on improving code and adding new functionalities, the software (packages and files they contain) changes with every new release. To make sure that your custom patches are up-to-date after a software upgrade to a new release, you will always need to sync your custom patches with the updated underlying code and fix any hunks in your patches that no longer apply. This is called rebasing your custom patches. By setting a specific lifetime for your custom patches, you ensure that the patch will not be applied to a new release where it hasn’t yet been tested by your team. Another example might be when a patch is only applied to certain releases or builds because in later releases, it loses its viability.
How to use the lifetime of a patch
The lifetime parameter permits the specification of specific software releases and builds. An RPM for a new version with a patch included will automatically be rebuilt and installed (during the PortaSwitch update procedure).
There can be several patches with different (or the same) lifetimes for one package but only one of them can be active. If there is an active patch (included in a successfully built RPM package) and a new RPM package with another patch has been successfully built, the latter patch becomes active and the former patch becomes "new" (the RPM package with the former patch is removed from the repository).
Lifetime can be one of the following:
- Forever – an RPM package with custom patch included will automatically be rebuilt and installed during every PortaSwitch update procedure. In case of failure, the PortaOne support team will notify you about the error.
- Release – an RPM package with custom patch included will automatically be rebuilt and installed during a PortaSwitch update to any build within a specific release.
- Build – an RPM package with custom patch included will automatically be rebuilt and installed during a PortaSwitch update to a specific build ONLY.
You can specify a Source code for building an RPM package. It can be one of the following:
- Latest – defined by active configuration (e.g., latest hotfix for current build).
- Strict – user defined build string (e.g., "39.0-2.20101213" – source RPM package for MR39-0-1-be).
Note that the above feature is mainly used by the PortaOne support team to manage available hotfixes for a specific RPM package. If you need the list of available build strings, please contact the PortaOne support team at support@portaone.com.
In the case of a strict build, its string is displayed in brackets in the Life time column of the patches list.
Patch application to an RPM package
When you introduce changes, either to PortaOne packages or to third-party ones, you want the changes to remain effective after the software upgrade procedure. To do this it is necessary to prepare a custom patch (a file that describes the differences between the original and modified files) and upload it to the Custom tab. Below you will find step-by-step instructions on how to create and apply a custom patch and helpful hints on how to ensure that it works with the new software release.
Patch preparation
To prepare a patch we use a standard "diff" Linux command that makes a line-by-line comparison between the original and modified files and shows the difference in a specific format. Let’s consider this example of patching the /home/porta-billing/site_lib/Porta/Modules/VoiceCallsRoaming.pm file if changes were introduced into this module file and the custom modified file was saved as /home/porta-one/VoiceCallsRoaming.pm.patched:
Follow these steps to prepare a patch with your custom modifications. Please note that you will need to run some of these commands with root-level privileges (e.g., use the sudo command):
- Go to the directory where the original file is located:
cd /home/porta-billing/site_lib/Porta/Modules - Rename the original file to VoiceCallsRoaming.pm.orig, and your custom modified file to VoiceCallsRoaming.pm:
mv VoiceCallsRoaming.pm /home/porta-one/VoiceCallsRoaming.pm.origmv VoiceCallsRoaming.pm.patched VoiceCallsRoaming.pm - Find the name of the RPM that contains the file. The patch must be applied to this very RPM:
rpm -qf VoiceCallsRoaming.pm - The command will have the following output:
porta-billing-38.0-3.20131215.el6.noarchwhere "porta-billing" is the name of the RPM and 38.0-3.20131215 is the build string Go to the SRPM (Source RPM) package root folder (see Paths to tops of build areas for the most useful SRPM packages):
cd /home/porta-billing/Now you are in the /home/porta-billing/ folder
- Create a patch using this single command:
diff -Nau /home/porta-one/VoiceCallsRoaming.pm.orig site_lib/Porta/Modules/VoiceCallsRoaming.pm > /var/tmp/VoiceCallsRoaming.pm.patch - Check that the patch was created correctly and that it only contains required modifications:
less /var/tmp/VoiceCallsRoaming.pm.patch - Download this file (/var/tmp/VoiceCallsRoaming.pm.patch) to your local PC (if you use Windows OS you may use a program like WinSCP for this)
Patch upload
Upload the patch to the Custom tab for the ‘porta-billing’ RPM package and try to rebuild it:
- Log in to the Configuration server web interface and go to the Update > Custom tab. On this tab, select which RPM package to apply the patch to.
- Click the
 icon on the left of the desired package to open its Patches block.
- Click Upload.

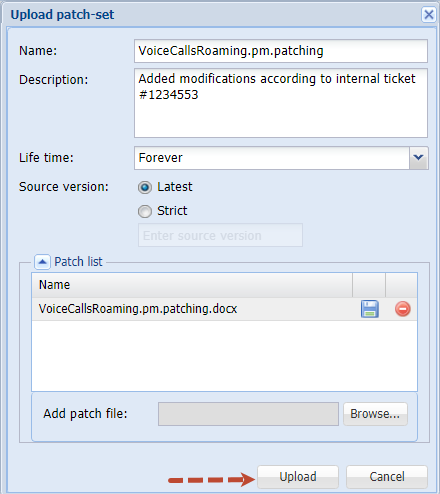
- Specify the patch name and select the patch file to add it to the list.
- When the patch has been added click the Upload button.
- Click the Build button to rebuild the RPM package with the uploaded patch included.

- If the RPM package with the patch has been rebuilt successfully, you will see the green indicator in the patch Name column. If the indicator is red, then the RPM hasn’t been rebuilt with this patch and you can click the
 icon to find the reason in the logs.
- Now the patched PortaOne package can be installed via the software upgrade (as a separate operation or as part of a PortaSwitch update procedure). If you wish to install a newly built package, please contact the PortaOne support team at support@portaone.com, who will provide you with further assistance.
Paths to tops of build areas in SRPM packages
The following table provides paths to the tops of build areas for patching SRPM packages. For example, to modify /opt/diaconv/file specify the ./diaconv/file path in a patch file’s header.
|
SRPM |
The Path on the File System |
The Path in a Patch File |
|---|---|---|
|
archivist |
/home/archivist/file |
./file |
|
b2bua |
/home/porta-sip/sippy/file |
./file |
|
checksuite |
/usr/share/suitability-checker/file |
./file |
|
dbup |
/home/porta-configurator/pcup/dbup/file |
./file |
|
dbup2 |
/home/porta-configurator/pcup/dbup2/file |
./file |
|
diaconv |
binary |
./file |
|
edgeproxy |
binary |
./file |
|
extractaudio |
binary |
./file |
|
fopd |
binary |
./file |
|
g729client |
binary |
./file |
|
g729d |
binary |
./file |
|
imgate |
binary |
./file |
|
libg723-devel |
binary |
./file |
|
libg729-devel |
binary |
./file |
|
libilbc-devel |
binary |
./file |
|
liblog |
binary |
./file |
|
limit-controller |
binary |
./file |
|
log4cplus-python |
binary |
./file |
|
makeann |
binary |
./file |
|
oracle-encrypt |
binary |
./file |
|
porta-admin |
/home/porta-admin/file |
./file |
|
porta-base |
/home/porta-base/file |
./file |
|
porta-billing |
/home/porta-billing/file |
./file |
|
porta-callrecording |
/home/porta-callrecording/file |
./file |
|
porta-cdrimport |
/home/porta-cdrimport/file |
./file |
|
porta-cdrmediator |
/home/porta-cdrmediator/file |
./file |
|
porta-configurator |
/home/porta-configurator/file |
./file |
|
porta-configurator-data |
/home/porta-configurator/data/file |
./file |
|
porta-db |
/home/porta-db/file |
./file |
|
porta-monitor |
/usr/libexec/nagios/portaone/file /var/www/nagios/rrd/file /etc/nagios/file |
./config/file./plugin/file./rrd/file |
|
porta-mp-signup |
/home/porta-admin/apache/multi_product_signup/file |
./file |
|
porta-mysql |
/usr/lib/systemd/system/porta-mysqld.service |
./porta-mysqld.service |
|
porta-oracle |
/home/oracle/file |
./file |
|
porta-presence |
/home/porta-presence/file |
./file |
|
porta-radius |
/home/porta-radius/file |
./file |
|
porta-rt |
/home/porta-rt/file |
./file |
|
porta-selfcare |
/home/porta-admin/apache/IPCentrex_SelfCare/file |
./file |
|
porta-selfcare |
/home/porta-admin/apache/IPCentrex_SelfCare/file |
./file |
|
porta-signup |
/home/porta-admin/apache/signup/file |
./file |
|
porta-sip |
/home/porta-sip/file |
./file |
|
porta-smstrigger |
/home/porta-smstrigger/file |
./file |
|
porta-um |
/home/porta-um/file |
./file |
|
porta-ws |
/home/porta-ws/file |
./file |
|
protector |
/home/protector/file |
./file |
|
registrar |
binary |
./file |
|
runtest |
/home/porta-one/billing-performance/file |
./file |
|
siplogindexer |
binary |
./file |
|
sip-prompts |
/var/lib/porta-sip/sounds/file |
./file |
|
sip-subscription-manager |
binary |
./file |
|
ua-profile-gen |
/home/porta-admin/utils/ua/file |
./file |
|
um-prompts |
/var/lib/psmsc/prompts/file |
./file |
|
wssetup |
/usr/share/wssetup/file |
./file |


