This handbook demonstrates how a Mobile Virtual Network Operator (MVNO) can configure PortaBilling as an online charging system (OCS) in the mobile network to perform real-time user authorization and charging for voice calls.
The component responsible for interacting with the OCS is the Mobile Switching Center (MSC) in 2G/3G networks or the IP Multimedia Subsystem (IMS) in 4G networks.
The MSC/IMS communicates with PortaBilling via the Diameter (Ro) interface for real-time authorization and charging (AAA) for voice calls. In 2G/3G networks, there is typically an additional component that converts mobile-specific protocols, such as CAMEL, into general IP-based charging protocols like Diameter. From the perspective of the OCS, it will look almost the same.
Example
Spanish MVNO offers a bundle of “1000 minutes of domestic voice calls, 5 GB of wireless data, and 200 domestic SMS” for 19 EUR.
Preparation
Before you proceed with the configuration steps, coordinate with your MNO on the following:
- If you have not enabled billing via the Diameter protocol yet, you need to decide on the “host” and “realm” values that will be used as your system identifiers in the mobile network, e.g., ocs.company-domain.com as “host” and company-domain.com as “realm.” The MNO’s network equipment should be configured with these identifiers, for the equipment to “know” where to send the Diameter requests (these values will be specified in the Destination-Host and Destination-Realm attribute-value pairs). These values should also be set on the Configuration server web interface within the Origin-Host and Origin-Realm options.
Enabling the Diameter module using these identifiers is a common step for configuring LTE, voice calls, and SMS. If you have already configured LTE service or SMS, you can skip this step. For voice calls and SMS, ensure that billing via Diameter Ro is also enabled (see configuration step 1.2).
- Obtain the MNO’s MSC/IMS identifiers to further specify them in the node settings. These identifiers are sent in the Origin-Host (e.g., ims.mno-domain.com) and Origin-Realm (e.g., mno-domain.com) AVPs (attribute-value pairs) in the Diameter requests sent from the mobile network to PortaBilling. This way, PortaBilling will be able to “understand” which piece of network equipment it’s interacting with. In case of roaming, prices will depend on the operator tier (e.g., roaming on the network of an operator in Australia or Africa is much more expensive than using operators in other EU countries). Therefore, it will be necessary to create separate tariffs depending on the pricing tier. This depends on various factors, including your circumstances and your roaming hub provider. For more details, please contact our support team.
Skip this step if your MNO uses the same equipment for both voice calls and SMS, and if you have already configured the node during the setup of the SMS service.
Configuration overview
- Setup on the Configuration server web interface
- Enable the external systems provisioning framework
- Create a node
- Configure MNO as a vendor:
- Configure services
- Set up the product:
- Upload mobile phone numbers (MSISDNs) into the DID inventory
- Upload SIM cards into the SIM card inventory
- Configure a mobile Internet subscriber:
1. Setup on the Configuration server web interface
To set up the voice calls service, allow the PortaBilling server to exchange charging requests with the mobile network via the Diameter Ro protocol.
Log in to the Configuration server web interface and perform the following steps:
1.1 To allow billing via the Diameter protocol, go to BillingEngine > Diameter group and configure the following global options:
- Enabled – set to Yes.
- Origin_Host – specify the “host” value that is configured as your system identifier on the MNO’s network equipment, e.g., ocs.company-domain.com (on the MNO’s side, it’s the Destination-Host value).
- Origin_Realm – specify the “realm” value that is configured as your system identifier on the MNO’s network equipment, e.g., company-domain.com (on the MNO’s side, it’s the Destination-Realm value).
Leave the default values for other fields.
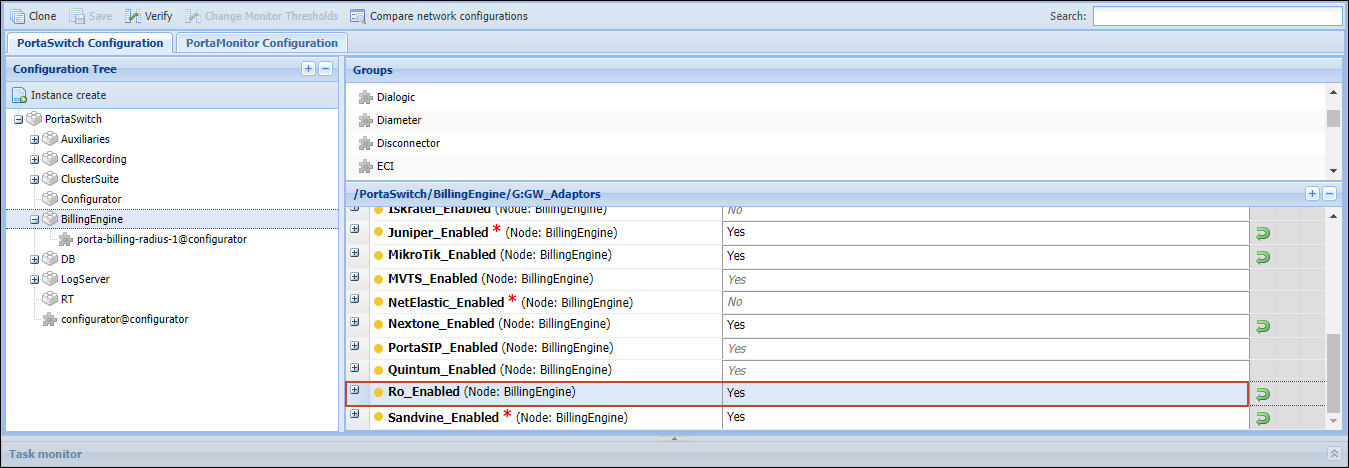
1.2 To enable billing via the Diameter Ro, set the GW_Adaptors.Ro_enabled option to Yes.
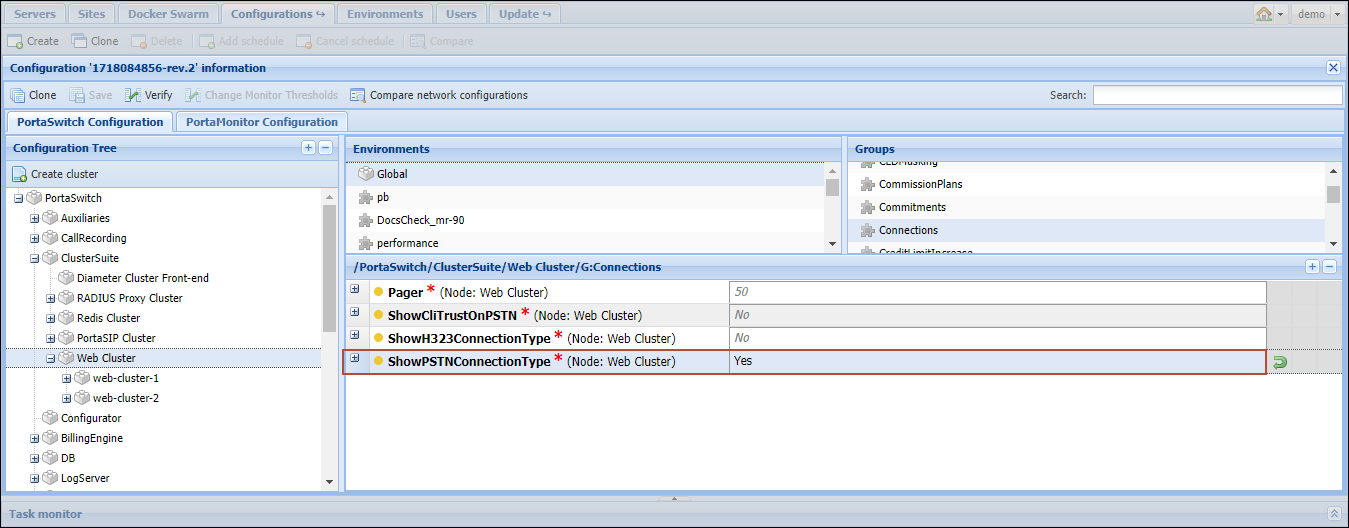
1.3 To set up voice calls in PortaBilling, you need to define a vendor and a corresponding vendor connection. Since the MNO routes the calls and you only handle the charges, at step 4.3 you will need to create a connection of the “PSTN” type. This connection will be used solely to keep records of all calls made via the mobile network, allowing you to separate them from other calls, such as those going to VoIP carriers if you also sell cloud PBX services using the same environment. To enable this type of connection in PortaBilling, set the Connections.ShowPSTNConnectionType option to Yes (this connection type is disabled by default since most of the operators use “VoIP” connections these days).
2. Enable the External Systems Provisioning Framework
PortaBilling uses the External Systems Provisioning Framework (ESPF) to update SIM card data in the mobile core components such as HLR. The ESPF captures changes within PortaBilling (e.g., a new customer has been created, new SIM card has been assigned to an existing account, or the account’s product was changed) and sends corresponding events to the provisioning middleware (developed by either PortaOne or a third-party). These events are then translated into actions within the mobile network. For example, this could involve creating a new record in HLR/HSS that represents a SIM card with a specific IMSI.
For step-by-step instructions on how to configure ESPF handlers and enable sending the needed events to the mobile core network, refer to the ESPF configuration handbook.
You can find the list of supported events here.
3. Create a node
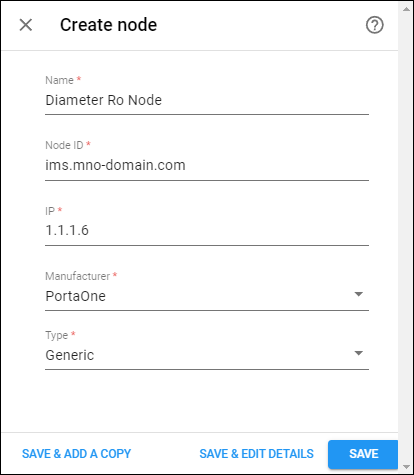
You need to add the MNO’s MSC/IMS as a node to enable it to exchange charging requests with PortaBilling.
3.1 To add a node:
- Navigate to Infrastructure > Nodes.
- Click Add and fill in the node details:
- Name – a short descriptive name for this node (e.g., “Diameter Ro Node”).
- Node ID – specify the “host” value identifying the MNO’s equipment (on the MNO’s side it’s specified in the Origin-Host AVP, e.g., ims.mno-domain.com).
- IP – specify the IP address of the MNO’s equipment. Since the node will be identified solely by the Node ID, the IP address is used solely for information purposes.
- Manufacturer – select PortaOne or, if available in the dropdown list, the specific vendor of the core network (this is only required when we have to add code to handle some proprietary attributes of the vendor).
- Type – select Generic.
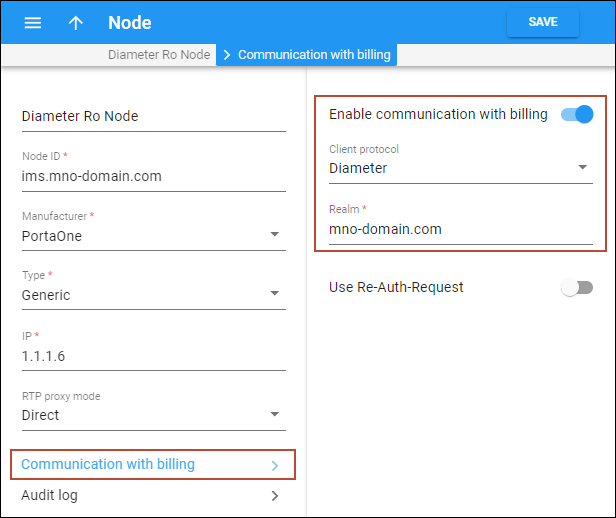
3.2 Enable the communication with PortaBilling via the Diameter protocol:
- Go to Node > Communication with billing.
- Turn on the Enable the communication with billing toggle.
- Fill in the details:
4. Configure MNO as a vendor
In the PortaBilling system, the MNO must be configured as a “vendor.” The wholesale per minute rates negotiated with the MNO should be put in the vendor tariff. The system will then calculate the cost of voice calls for the MVNO and this information can be used for reconciliation.
4.1 Create a vendor tariff
- Navigate to Service catalog > Tariff.
- Click Add and fill in the tariff details:
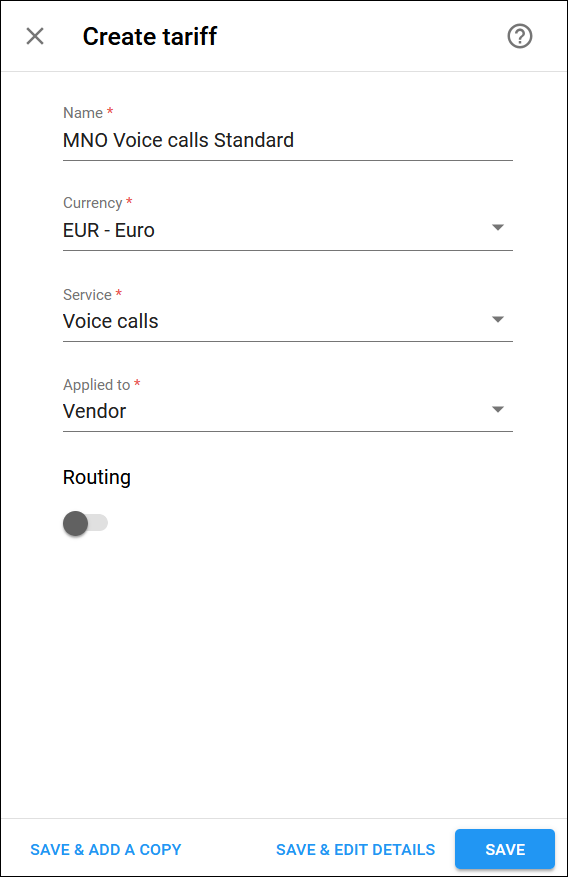
- Name – specify a descriptive name for the tariff, e.g., “MNO Voice calls Standard,” which will be used within the system.
- Currency – choose the currency in which the vendor charges you.
The currency for the tariff may be chosen only once and cannot be changed later.
- Service – select Voice calls.
- Applied to – choose Vendor.
- Routing – leave this toggle disabled.
- Open the Rates tab in the “MNO Voice Calls Standard.”
To add a rate, you need to specify a destination (phone prefix). Make sure that the needed destinations have been added to the system. See more details on how to create destinations in the Initial configuration of PortaBilling handbook.
You can add rates one by one or upload them from a file. To download the file sample with all the required columns, click Rate download on the toolbar, then open the notifications tab and click download.
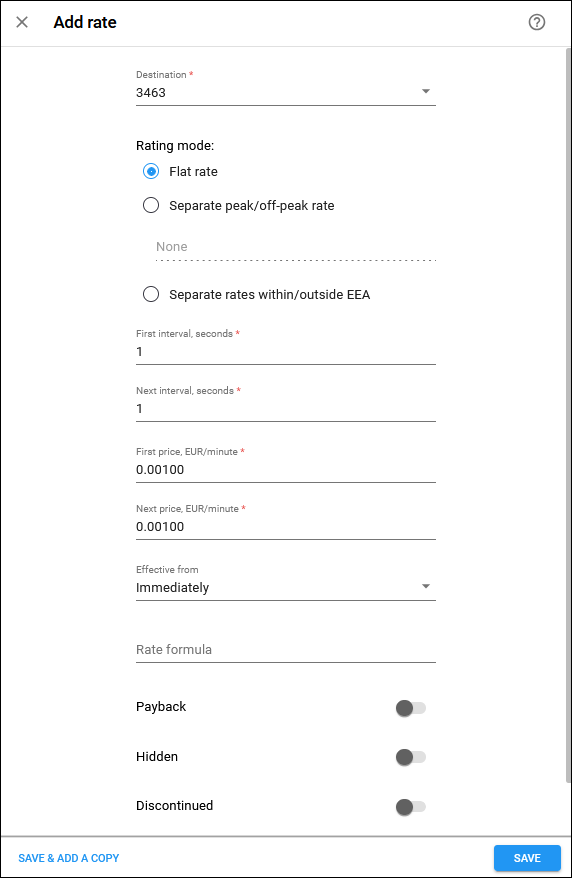
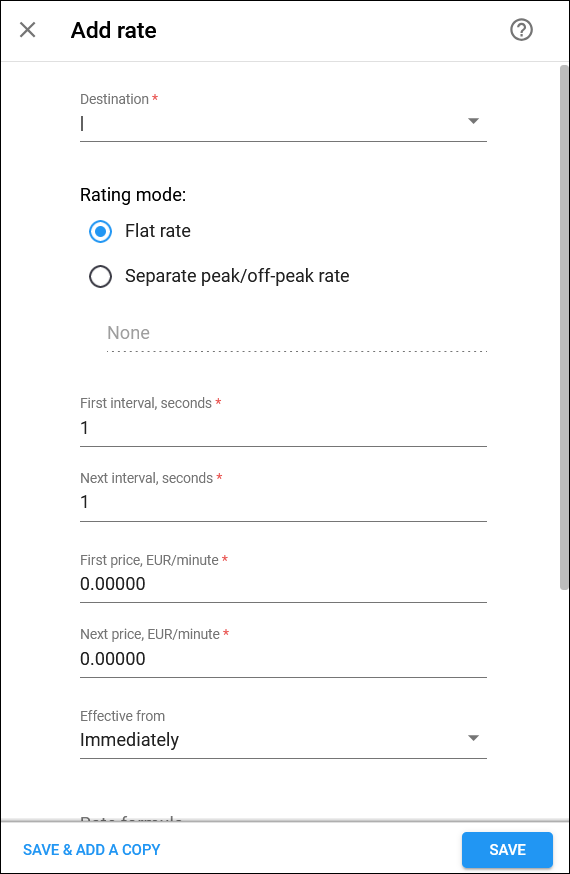
To add a rate manually, click Add and fill in the rate details:
- Destination – type in a specific phone prefix or select it from the list.
- Rating mode – select Flat rate. To enter different rates for the peak and off-peak periods, select the Separate peak/off-peak rate option.
- First interval, seconds – specify the first rounding interval in seconds (default is 1 second). This interval defines the minimum duration of the call that is going to be billed. For instance, if the first interval is set to 30 seconds, a call lasting between 1 and 30 seconds will be billed as a 30-second call.
- Next interval, seconds – specify the next rounding interval in seconds (default is 1 second). This determines how the call duration beyond the initial interval is billed. For example, if the next interval is set to 1 second, any duration beyond the initial interval will be billed in 1-second increments. If you set the first interval to 30 seconds and the next interval to 1 second, and the call lasts for 36 seconds, the customer will be charged for 36 seconds.
- First price – specify the per-minute price for the first interval.
- Next price – specify the per-minute price for the next interval.
- Effective from – specify when the rate becomes effective. By default, this parameter is set to “immediately”. If you want this rate to take effect in the future, select “Specific time” and type in the date manually, or select it from the calendar.
4.2 Create a vendor
- Navigate to Infrastructure > Vendors.
- Click Add and fill in the vendor details:
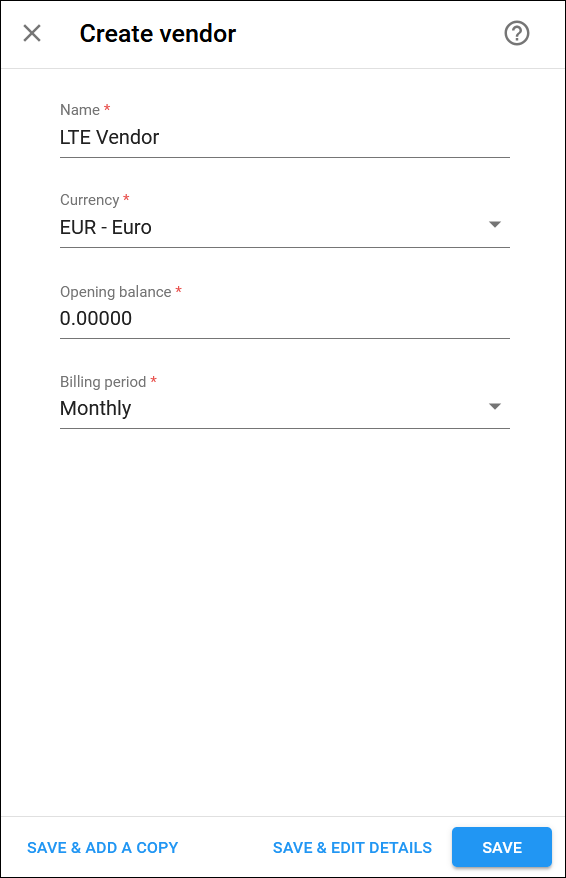
- Name – specify a descriptive name for the vendor (e.g., “LTE Vendor”).
- Currency – leave the base currency.
- Opening balance – this option is usually used when you migrate a vendor from a legacy system to PortaSwitch. Leave “0” here.
- Billing period – choose a billing period for the vendor. A billing period defines how often the vendor will bill you, e.g., monthly.
4.3 Define a vendor connection
By design, a connection needs to be defined for the “vendor” entity in PortaBilling to route voice calls from the service provider’s network to a vendor. Since the routing is handled by the MNO, create a connection of the “PSTN” type just to keep records of all calls made via the mobile network (this connection will be associated with the vendor tariff created at step 4.1).
To create a connection:
- Open Vendor > Connections.
- Click Add and fill in the connection details:
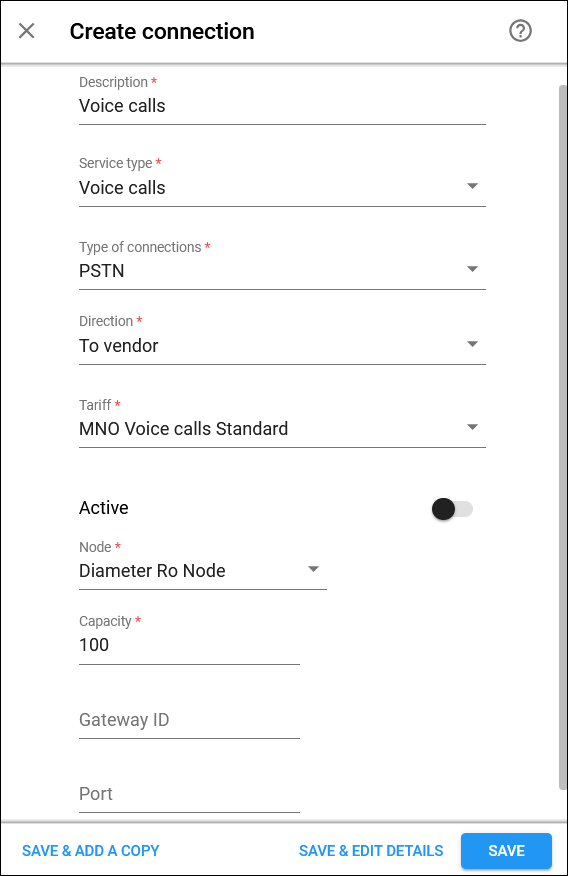
- Description – type in a short description for this connection (e.g., “Voice calls”).
- Service type – select “Voice calls”.
- Type of connections – select “PSTN”.
- Direction – select “To vendor.”
- Tariff – select the vendor tariff that you created at step 4.1.
- Active – leave this toggle disabled.
- Node – select the node that you created at step 3.
- Capacity – this mandatory field is used to indicate the maximum number of concurrent calls. As this is not a real connection, this value will be used solely for correctly scaling the load graphs for the connection and will not actually limit calls. Specify any reasonable value expected in the near future to monitor the number of concurrent calls made by your subscribers.
- Gateway ID – leave this field empty.
- Port – leave this field empty.
5. Configure services
To correctly deduct minutes from the bundle, the system needs to distinguish between incoming and outgoing calls. For instance, if a customer receives an incoming call, the minutes from the “outgoing calls” bundle should not be deducted.
To ensure this, you will need to use two distinct services when setting up the product at step 6:
- For outgoing calls, you can use the default service “Voice calls”
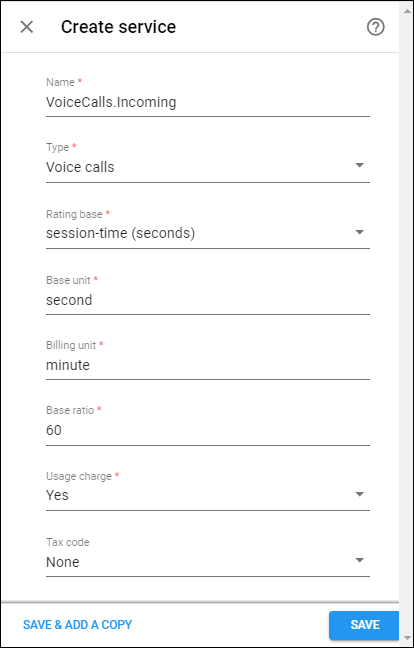
- For incoming calls, create a separate service of the Voice calls type, e.g., “VoiceCalls.Incoming.”
To create a service:
- Navigate to Service catalog > Services
- Click Add and fill in the details:
- Name – specify a short descriptive name, e.g., “VoiceCalls.Incoming”
- Type – select Voice calls
- Rating base – leave the default option session-time (seconds)
- Base unit – leave the default option second
- Billing unit – leave the default option minute
- Base ratio – leave the default value 60
- Usage charge – select Yes
- Tax code – select the needed tax code.
- Click Save.
6. Set up the product
To provide voice calls service to your customers as described in the example, you need to create a Product that includes:
- A Bundle “1000 minutes of domestic voice calls, 5 GB of wireless data, and 200 domestic SMS for 19 EUR.”
- Tariffs with pay-as-you-go rates. To enable your customers to make and receive calls, you need to create two tariffs: one for outgoing calls and another for incoming calls.
Typically, service providers do not charge their customers for incoming calls as there are no costs associated with these calls. Therefore, the tariff for incoming calls will include a single rate (applicable to any number) with zero price per minute.
6.1 Create a customer tariff for outgoing calls
- Navigate to Service catalog > Tariffs.
- Click Add and fill in the tariff details:
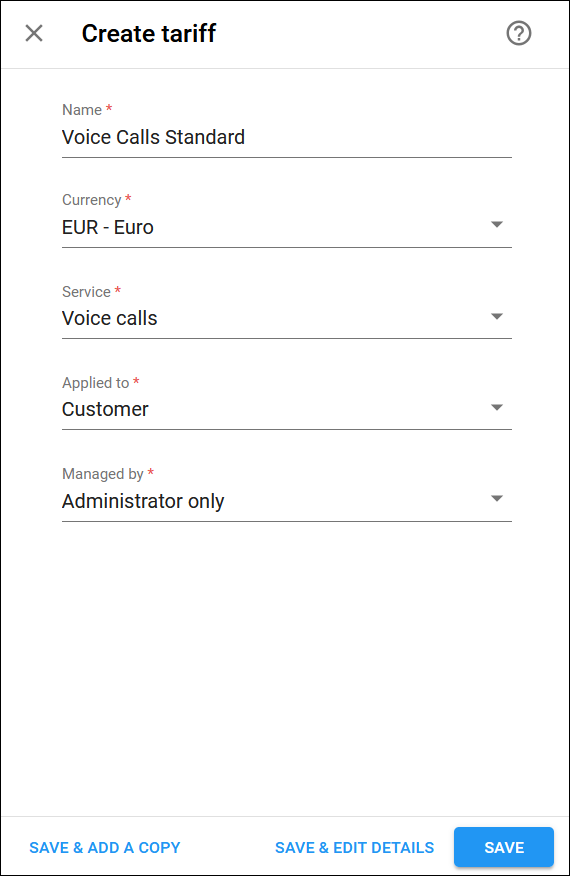
- Name – type in a short name for the customer tariff, e.g., “Voice Calls Standard”; this name will be shown within the system.
- Currency – select the currency in which you will charge your customers.
- Service – select Voice calls.
- Applied to – select Customer as this tariff will be used to charge your customers.
- Managed by – select Administrator only here.
- Open the Rates tab in the “Voice Calls Standard” tariff.
To add a rate, you need to specify a destination (phone prefix). Make sure that the needed destinations have been added to the system. See more details on how to create destinations in the Initial configuration of PortaBilling handbook.
You can add rates one by one or upload them from a file. To download the file sample with all the required columns, click Rate download on the toolbar, then open the notifications tab and click download.
To add a rate manually, click Add and fill in the rate details:
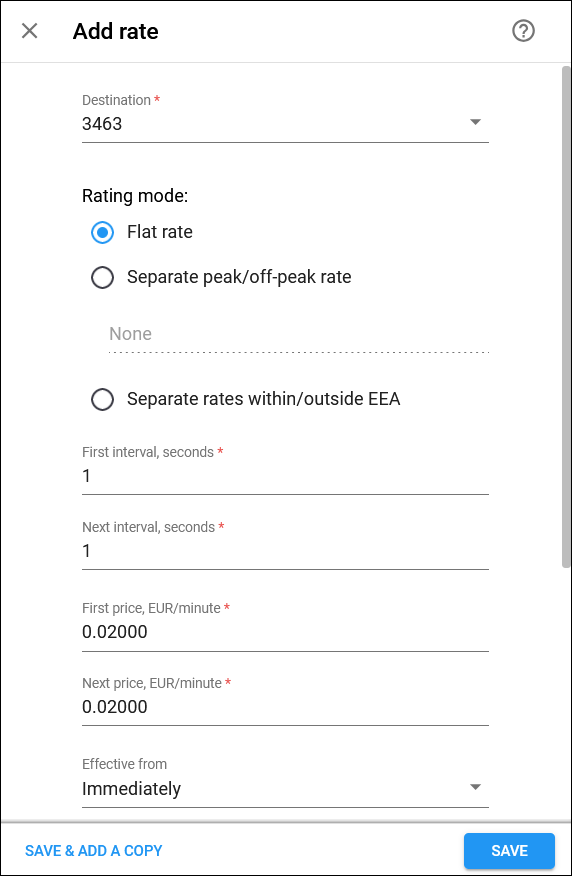
- Destination – type in a specific phone prefix or select it from the list.
- Rating mode – select Flat rate. To enter different rates for the peak and off-peak periods, select the Separate peak/off-peak rate option.
- First interval, seconds – specify the first rounding interval in seconds (default is 1 second). This interval defines the minimum duration of the call that is going to be billed to the customer. For instance, if the first interval is set to 30 seconds, a call lasting between 1 and 30 seconds will be billed as a 30-second call.
- Next interval, seconds – specify the next rounding interval in seconds (default is 1 second). This determines how the call duration beyond the initial interval is billed. For example, if the next interval is set to 1 second, any duration beyond the initial interval will be billed in 1-second increments. If you set the first interval to 30 seconds and the next interval to 1 second, and the call lasts for 36 seconds, the customer will be charged for 36 seconds.
- First price – specify the per-minute price for the first interval.
- Next price – specify the per-minute price for the next interval.
- Effective from – specify when the rate becomes effective. By default, this parameter is set to “immediately”. If you want this rate to take effect sometime in the future, select “Specific time” and type in the date manually, or select in the calendar.
6.2 Create a customer tariff for incoming calls
- Navigate to Service catalog > Tariffs.
- Click Add and fill in the tariff details:
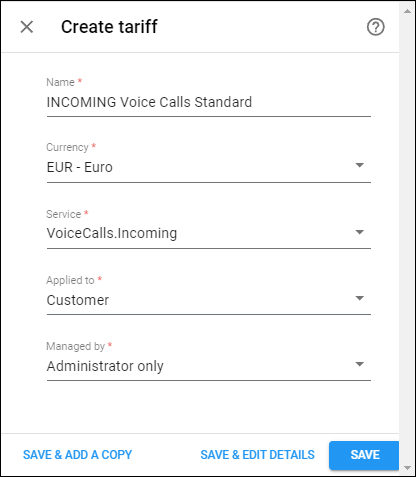
- Name – type in a short name for the customer tariff, e.g., “INCOMING Voice Calls Standard”; this name will be shown within the system.
- Currency – select the currency in which you will charge your customers.
- Service – select the service created at step 5 (“VoiceCalls.Incoming”).
- Applied to – select Customer as this tariff will be used to charge your customers.
- Managed by – select Administrator only here.
- Open the Rates tab in the “INCOMING Voice Calls Standard” and add rates as described in step 6.1. To ensure customers are not charged for incoming calls coming to any number they may have assigned to their device (e.g., when in addition to a local mobile number +34966XXXXXX they also purchased a phone number from the US or UK), you can add a single rate with zero price per minute for the wildcard (|) special destination to the tariff.
6.3 Create a destination group set and a destination group
Bundles don’t operate with individual phone prefixes because service providers typically configure a bundle for a group of prefixes at once (e.g., domestic calls for Spain would include +3493 for Barcelona, +3463 for Vodafone Spain, etc.). So to set up a bundle with 1000 minutes of domestic calls, you first need to configure a destination group, which includes all domestic prefixes. You can create multiple destination groups; for instance, if you plan to provide minutes for calls to the UK within the same bundle, you can create a separate destination group for UK prefixes. These destination groups must be included in the destination group set that will be then associated with the bundle. This hierarchical structure facilitates the configuration of bundles for broad categories of destinations.
To create a destination group set and a destination group:
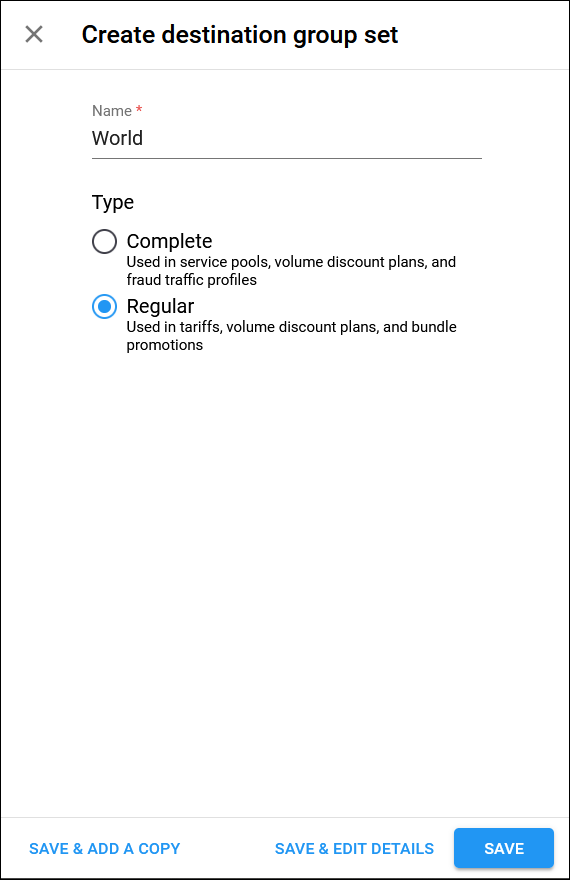
- Navigate to Service catalog > Destination group sets
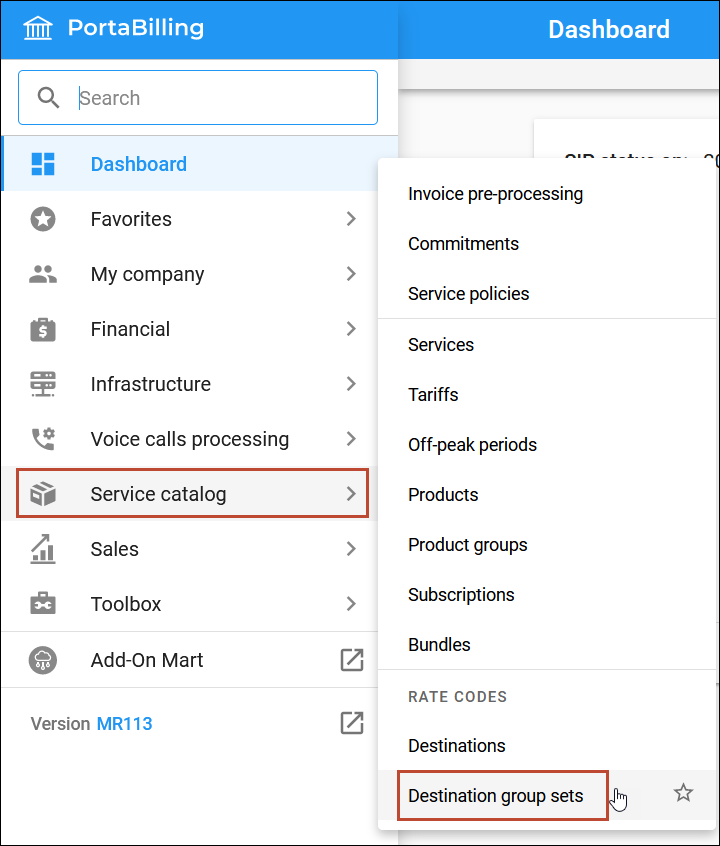
- Click Add and fill in the required information:
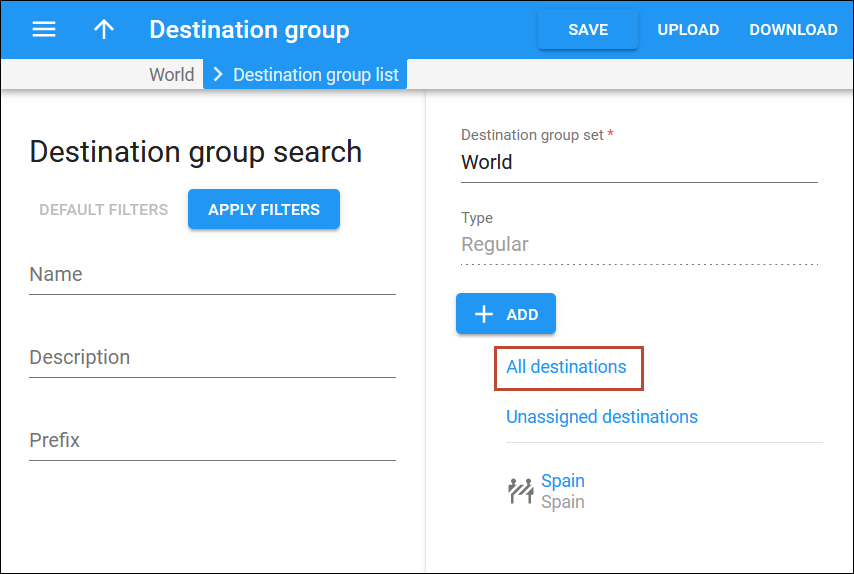
- Open the created Destination group set.
- Click Add and fill in the Destination group name and description, e.g., “Spain”.
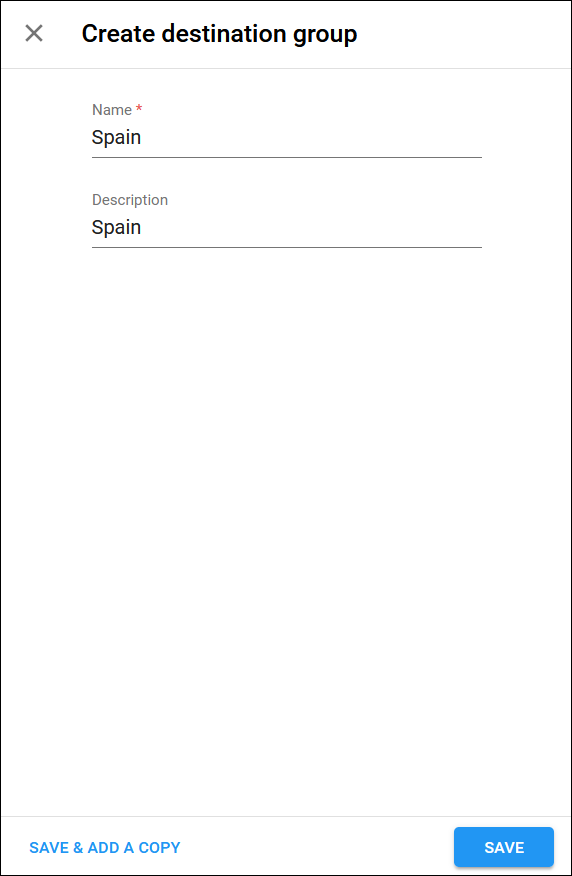
- Click Save to save the destination group.
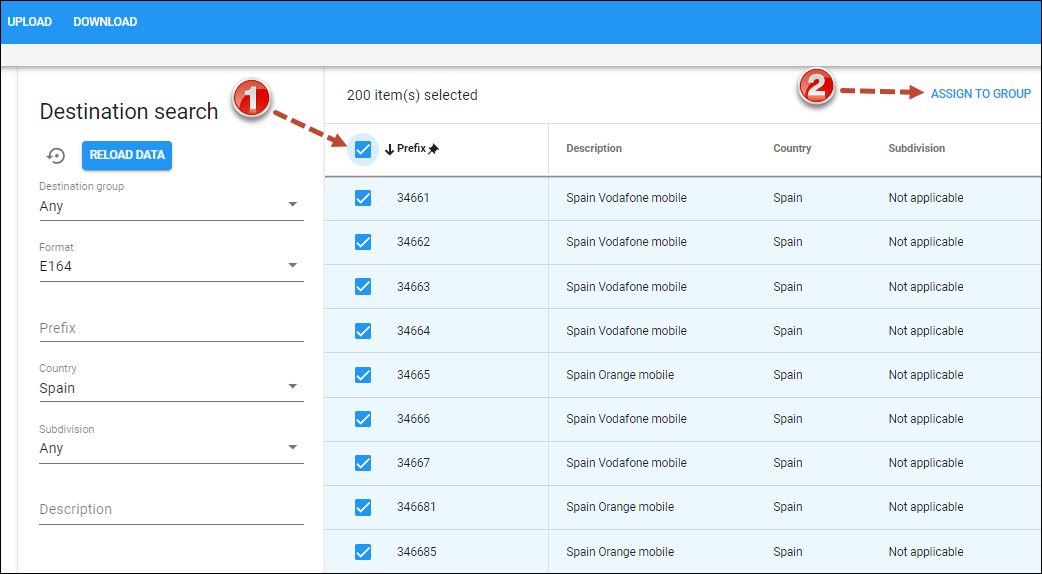
- To add all the domestic phone prefixes to the created destination group:
- On the Destination group page, click the default All destinations group.
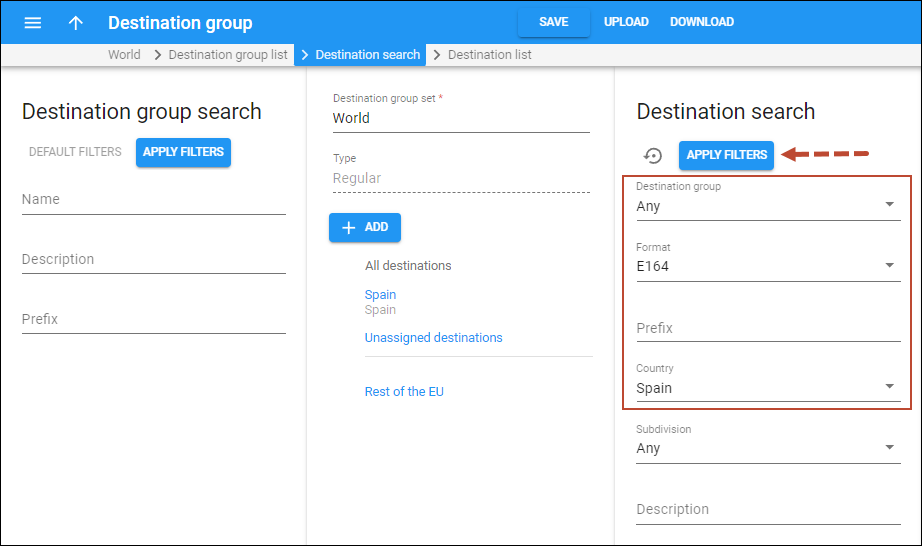
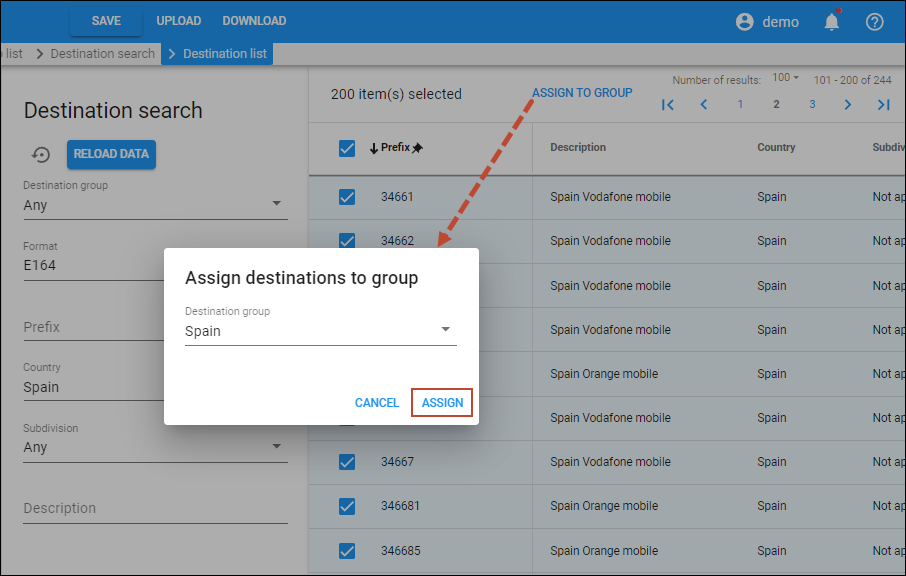
- On the Destination search panel, specify the parameters (e.g., format – E164, country – Spain) to find the required destinations in the list and click Apply filters.
- On the Destination list panel select all the prefixes you want to include in the destination group and click Assign to group.
Include the same prefixes that you use for the customer tariff in the destination group. For example, if you have the “3193” prefix for Barcelona in the tariff, make sure this prefix is also part of the destination group. Learn more about destination matching in bundles here.
- Select the destination group (“Spain”) and click Assign. The selected prefixes will be added automatically to the destination group.
6.4 Create a bundle and define the voice calls quota
The quota for voice calls (e.g., 1000 minutes) that has auto-renewal for a defined renewal fee (e.g., 19 EUR) can be provided within a prepaid bundle.
To configure a bundle:
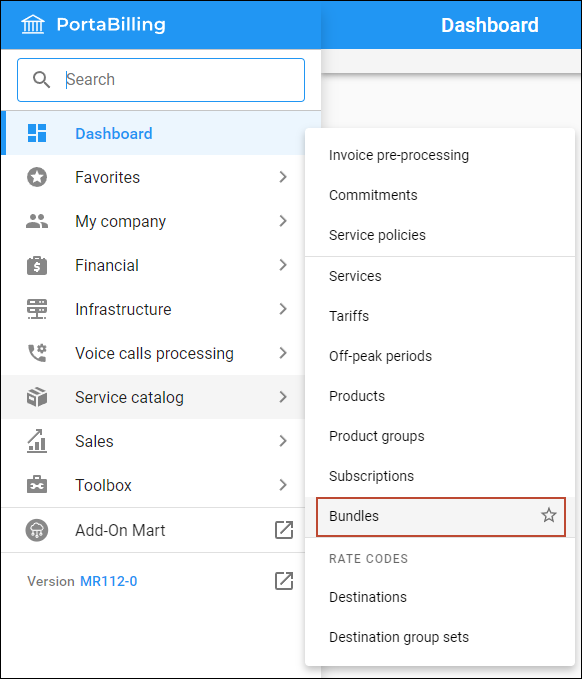
- Navigate to Service catalog > Bundles.
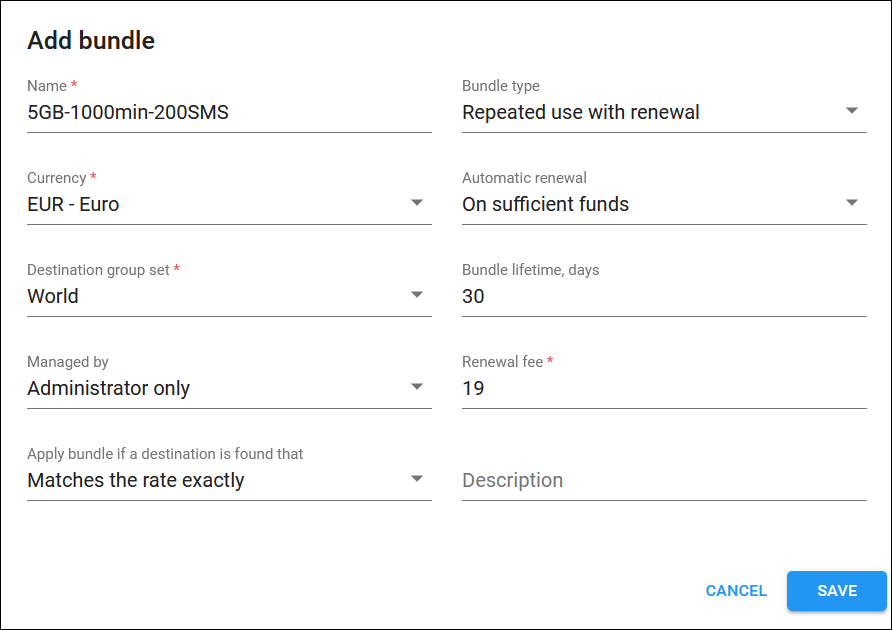
- Click Add and fill in the bundle details:
- Name – specify a unique bundle name (e.g., “5GB-1000min-200SMS”).
- Currency – select the currency in which you charge your customers.
- Destination group set – select the destination group set created at step 6.3.
- Managed by – select “Administrator only”.
- Apply bundle if a destination is found that – leave the default option “Matches the rate exactly”.
- Bundle type – select “Repeated use with renewal”.
- Automatic renewal – select “On sufficient fund” to automatically renew the bundle if the customer has enough (19 EUR) on their balance.
- Bundle lifetime, days – specify the value, e.g., 30 days.
- Renewal fee – specify 19 EUR.
- Description – optionally, you can add a short description for this bundle.
- Click Save.
- Open the created Bundle and go to Bundle items.
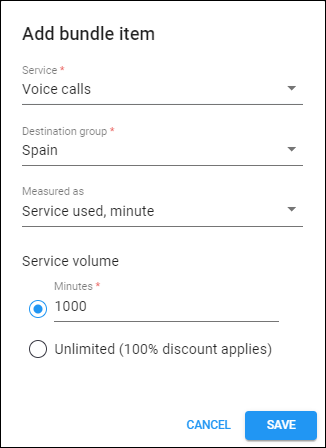
- Click Add and fill in the bundle item details:
- Service – select Voice calls (the default service used for outgoing calls).
- Destination group – select the destination group configured at step 6.3.
- Measured as – select Service used.
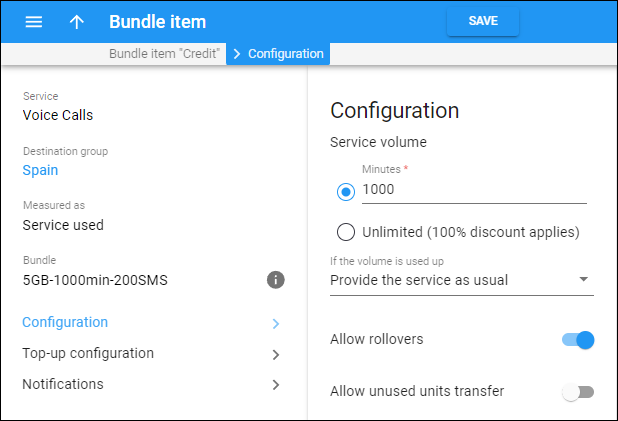
- Service volume – specify 1000 minutes.
- Click Save (you will be redirected to the Bundle item panel).
- Go to Bundle item > Configuration and set up the bundle item according to the given example:
- Set “Provide the service as usual” within the If the volume is used up option. This way, the voice calls will remain available after the allocated 1000 minutes are used up and will be charged according to the tariff.
- Turn on the Allow rollovers toggle if you wish to allow rolling over the unused minutes to the next 30-day cycle.
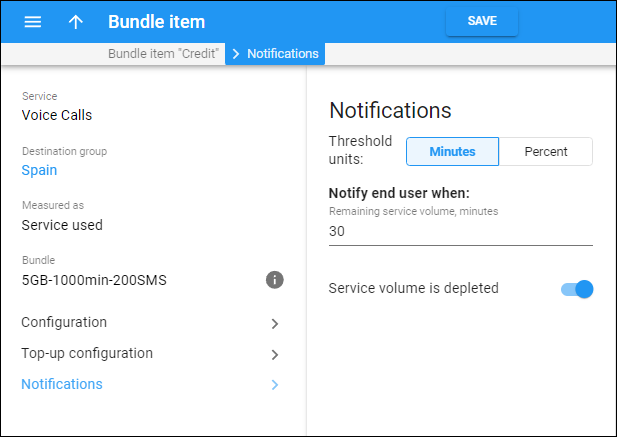
- Go to Bundle item > Notifications to configure notifications that will be sent to customers:
- Click Save.
6.5 Create a product
Create a product which will be assigned to accounts for service provisioning:
- Navigate to Service catalog > Products.
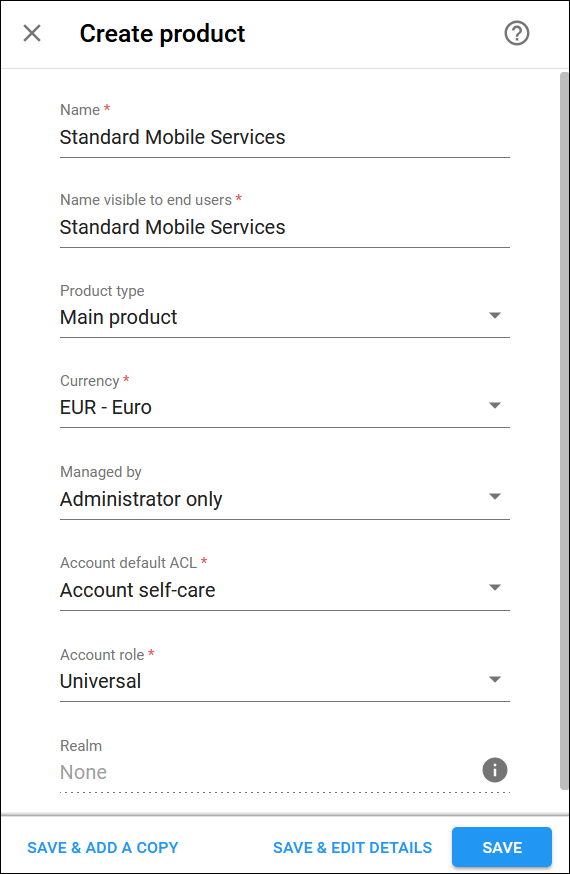
- Click Add and fill in the product details:
- Name – type in a short name for the product, e.g., “Standard Mobile Services”; this name will be used within the system.
- Name visible to end users – specify the name of the product that your customers will see on their self-care web interface.
- Product type – select Main product here.
- Currency – choose a currency the product will be priced in.
- Managed by – select Administrator only here, since we are setting up a service without the involvement of resellers.
- Account default ACL – choose an Access Control List (ACL) for accounts with this product assigned. ACLs control which objects end users can access and which actions they can perform.
- Account role – select “Mobile” to associate this product with mobile subscribers.
- Click Save.
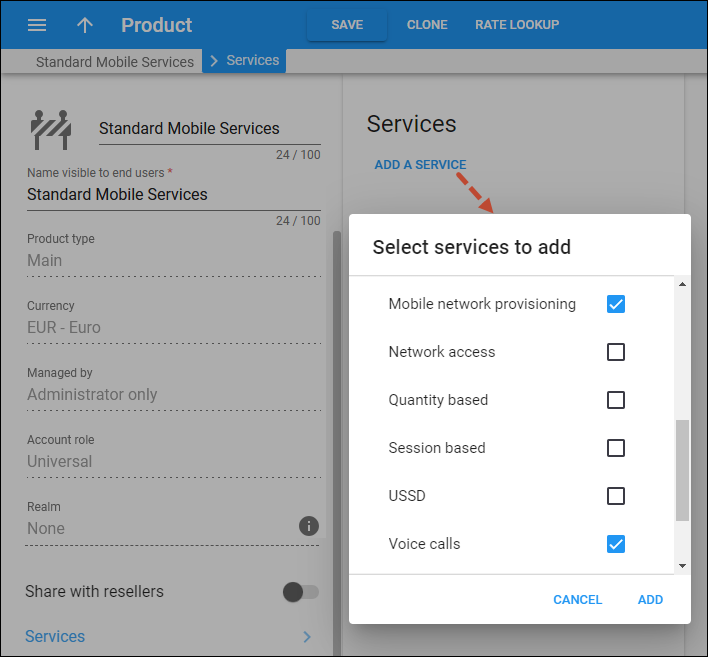
- Go to Product > Services and click Add to select services included in the product. For voice calls, you need to include the following services:
-
- Voice calls (the default service used for outgoing calls)
- VoiceCalls.Incoming (the service created at step 5 to prevent the deduction of incoming call minutes from the bundle)
- Mobile network provisioning (used for subscriber data provisioning into the mobile network)
To provide other services within this product, e.g., messaging service, include them in the list too. -
- Configure general info:
- Go to Product > Charges > General info and fill in the details:
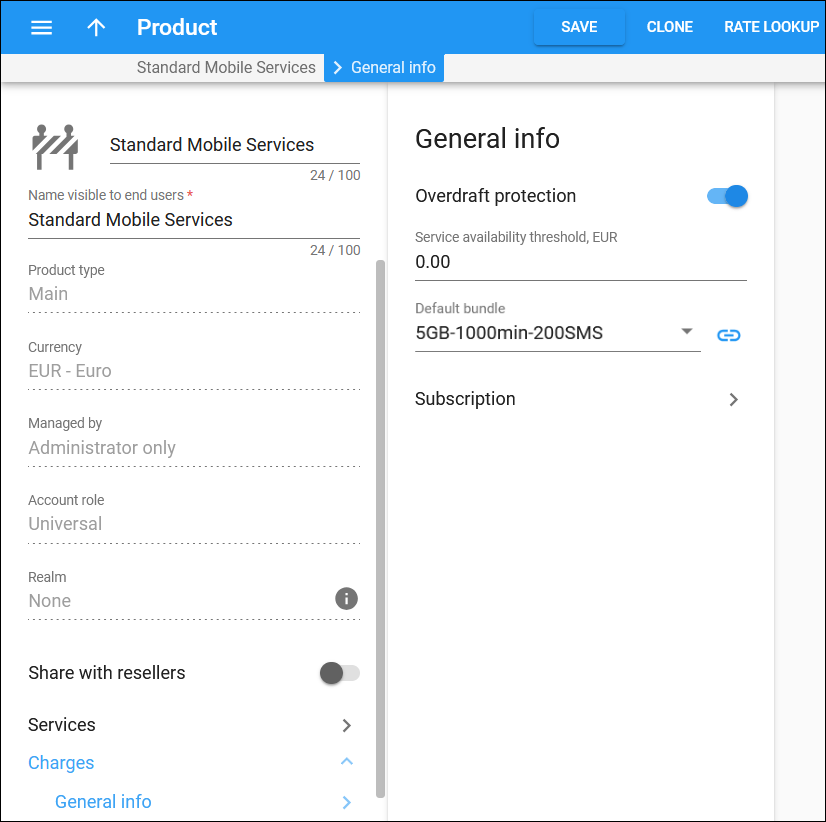
- Overdraft protection – leave the toggle turned on (turning off the overdraft protection is not recommended for general use).
- Default bundle – select the bundle created at step 6.4.
- Click Save.
- Go to Product > Charges > General info and fill in the details:
6.6 Configure usage charges for the product
- On your product’s panel, click Charges, then click Usage charges.
When setting usage charges for a service, we define permitted access points (nodes and access codes), and specify which tariff should be used for billing in each of these points.
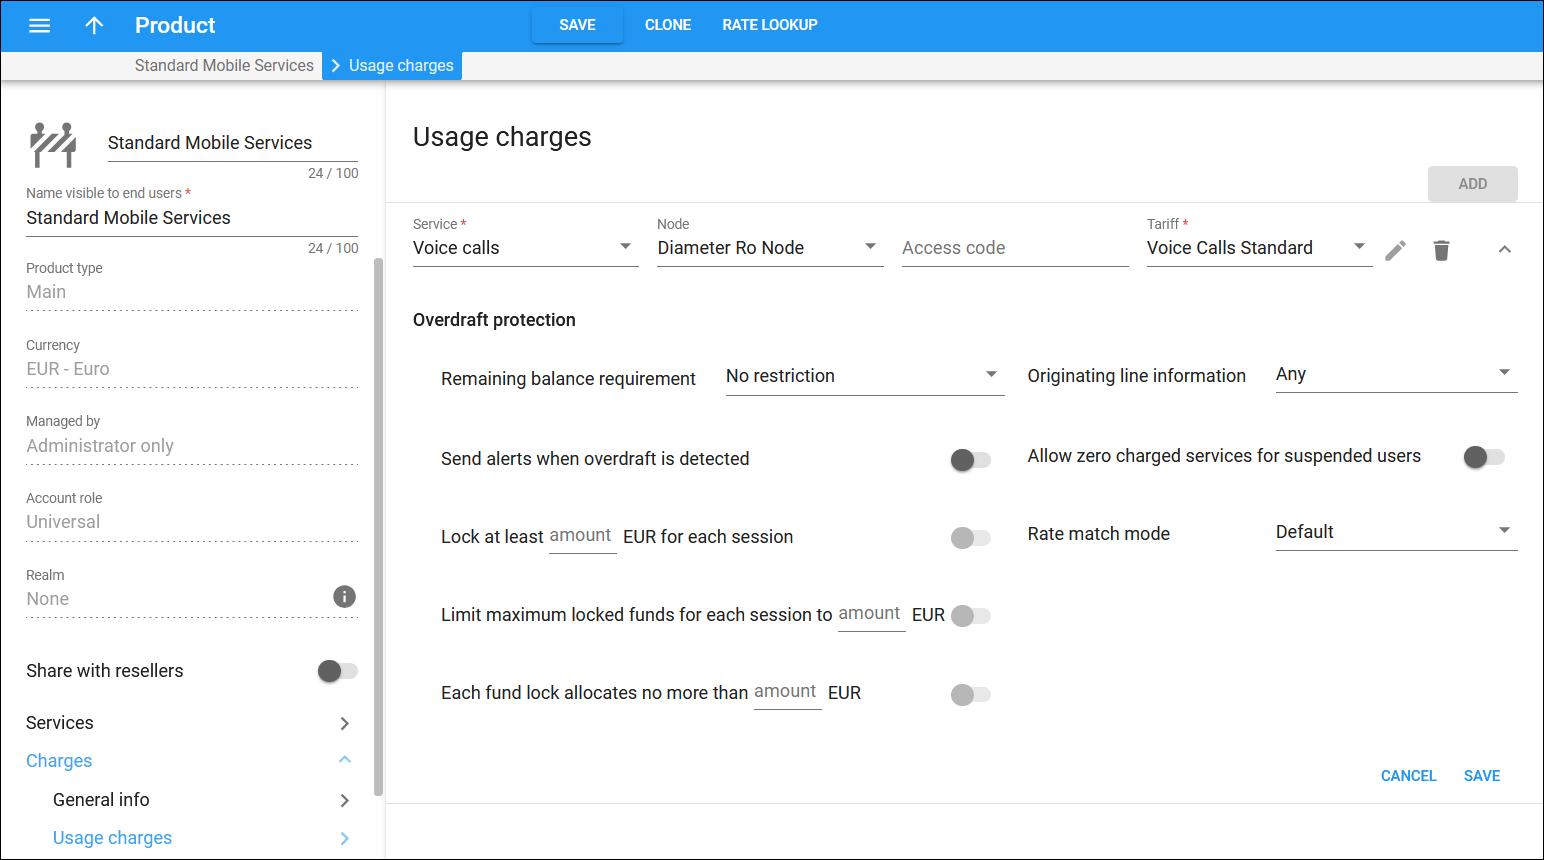
- To configure usage charges for outgoing calls:
- On the Usage charges panel, click Add and specify the following details:
- Service – select Voice calls.
- Node – select the Diameter Ro node created at step 3.
- Access code – leave this field empty.
- Tariff – select the tariff for outgoing calls created at step 6.1.
- Overdraft protection – to configure overdraft protection for this product, consult the Overdraft protection configuration handbook. In short, overdraft protection locks a certain amount of resources for each session. This enables the simultaneous consumption of the same quota across different sessions on various devices. Although it’s typically not a concern for basic LTE service, where customers generally use only one SIM card, it’s a good practice to leave the overdraft protection turned on.
- To configure usage charges for outgoing calls:
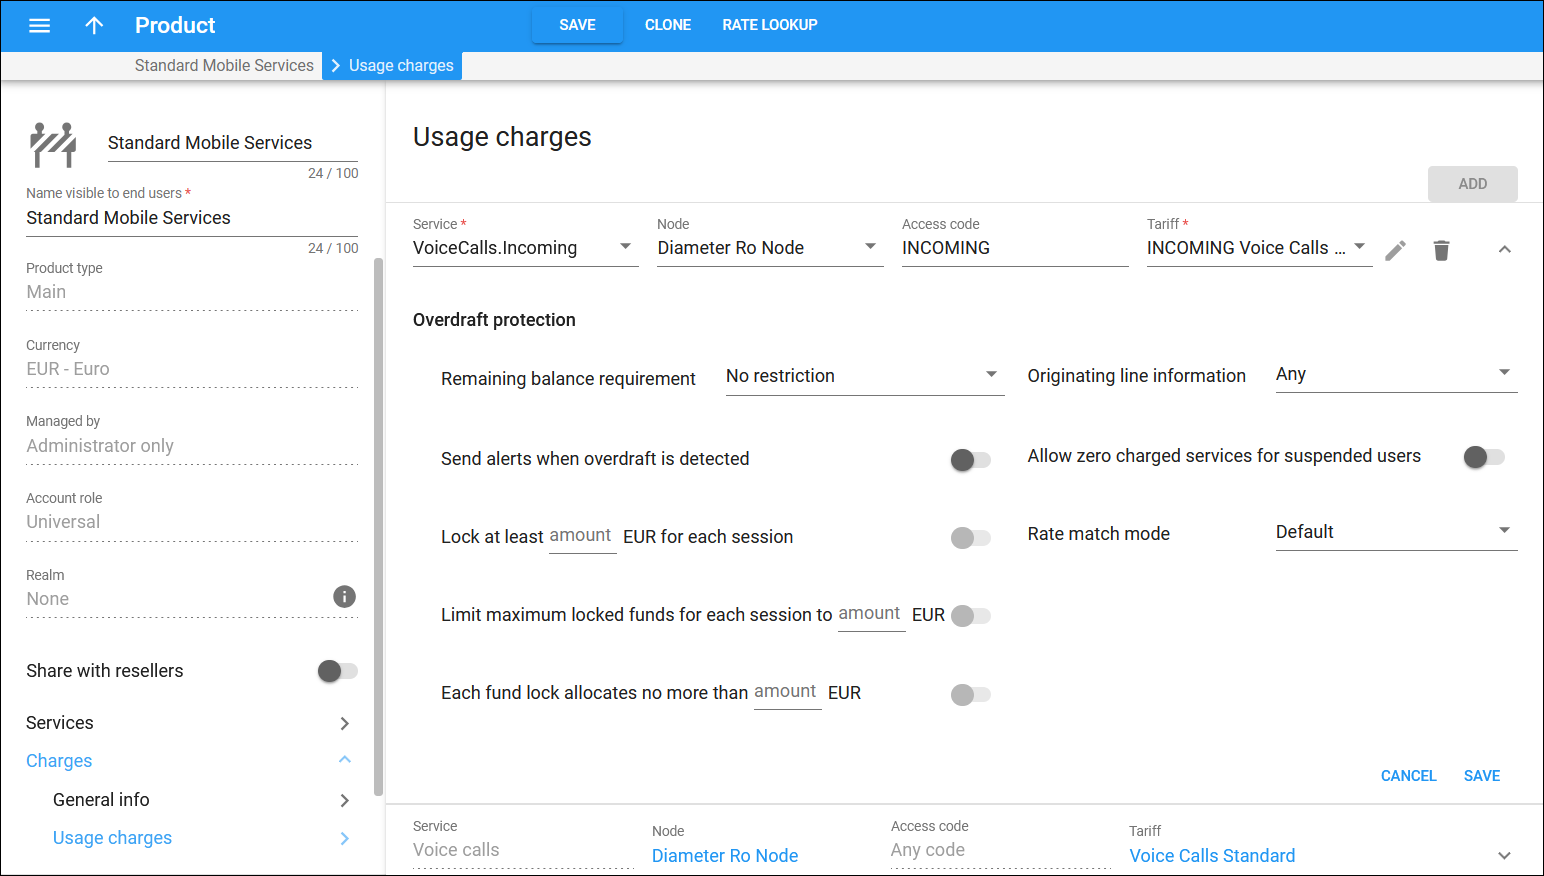
- To configure usage charges for incoming calls:
- On the Usage charges panel, click Add and specify the following details:
7. Upload mobile phone numbers (MSISDNs) into the DID inventory
Follow the instructions in the Managing available phone numbers (DID inventory) handbook to upload MSISDNs to the DID inventory.
8. Upload SIM cards into the SIM card inventory
Enter SIM cards into the SIM card inventory. You can add them manually (e.g., for testing purposes) or upload them from a file.
To manually add a SIM card, navigate to Infrastructure > Inventory > SIM cards, click Add, and fill in the details.
To upload SIM cards from a file, perform the following steps:
- Prepare a file in .csv, .xls or .xlsx format. Find the structure of the file in the table below:
|
Field |
Mandatory |
Format |
Description |
|
Action |
Yes |
Text. There are four possible defined values:
|
This defines the action applied to the given SIM card: “+” or add for adding a SIM card to the inventory; “–” or remove for removing a SIM card from the inventory. |
|
IMSI |
Yes |
Maximum 15 numerical characters. |
The unique international mobile subscriber identity of the card. |
|
ICCID |
Minimum 19, maximum 20 numerical characters. |
A SIM card’s unique serial number that can be found on the back of the SIM card. |
|
|
KI |
32 hexadecimal characters. |
Authentication key used during card authentication on the mobile network and for communication encryption between a SIM card and a mobile network. |
|
|
OPC |
32 hexadecimal characters. |
The operator key associated with and stored on this SIM card. |
|
|
AMF |
4 hexadecimal characters. |
The authentication code added to the SIM authentication. request. |
|
|
Description |
Maximum 255 text characters. |
Short description about a given SIM card. |
|
|
HLR |
Maximum 255 text characters. |
Home location register name. |
|
|
Managed by |
|
Text |
You can change your choice later for the uploaded SIM cards that are not in use. |
- Navigate to Infrastructure > Inventory > SIM cards.
- Click Upload.
- Drag and drop your file in the Upload SIM Cards dialog box or specify the file location (click
 Browse and select the .csv file), and then click Upload.
9. Configure a mobile Internet subscriber
9.1 Create a customer
A customer is an owner of accounts. Customer contact information is used for distributing account usage information, Internet access statistics, invoices, etc. You usually need to create one customer per each retail prepaid user.
- On the navigation menu, select Sales, then select Customers.
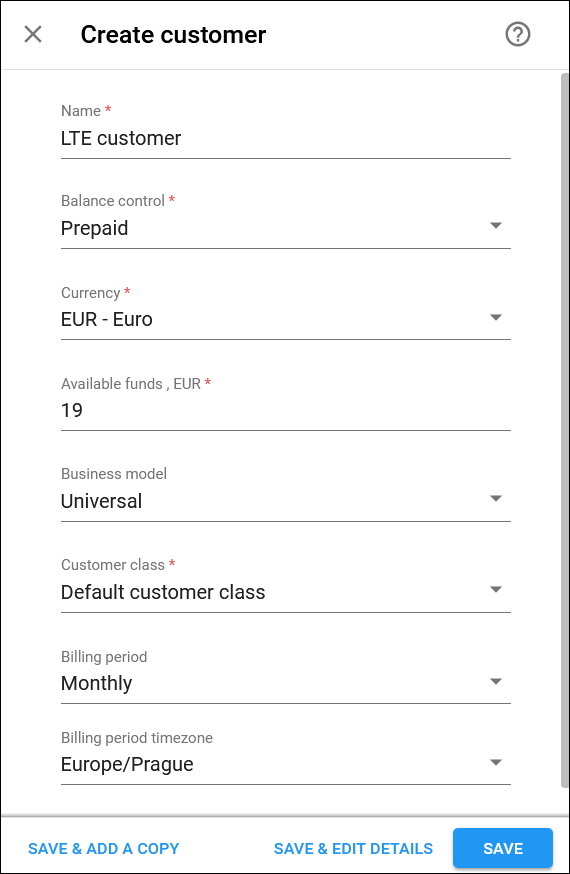
- On the Create customer panel, fill in the customer details:
- Name – type a short name for the customer object; this will be used on the web interface.
- Balance control – select Prepaid.
- Currency – choose the currency in which this customer will be billed.
- Available funds – the amount of funds available for the customer to spend on services (e.g., 19 EUR for bundle activation). If the customer has a debit account, the account’s funds will be used.
- Business model – a business model defines what type of service is to be provided to the customer. Select Mobile for this customer.
- Customer class – customer class allows you to define a policy for automated payment collection. By choosing a specific class here the customer will automatically inherit all of the class properties (grace period, invoice template, etc.). Select the previously created customer class.
- Billing period – choose a billing period for the customer.
- Billing period time zone – choose a time zone in which the customer’s billing period will be closed.
- Click Save.
9.2 Create an account
Create an account for each unique SIM card.
- On your customer’s panel, click Accounts.
- On the Create an account panel, specify the account details:
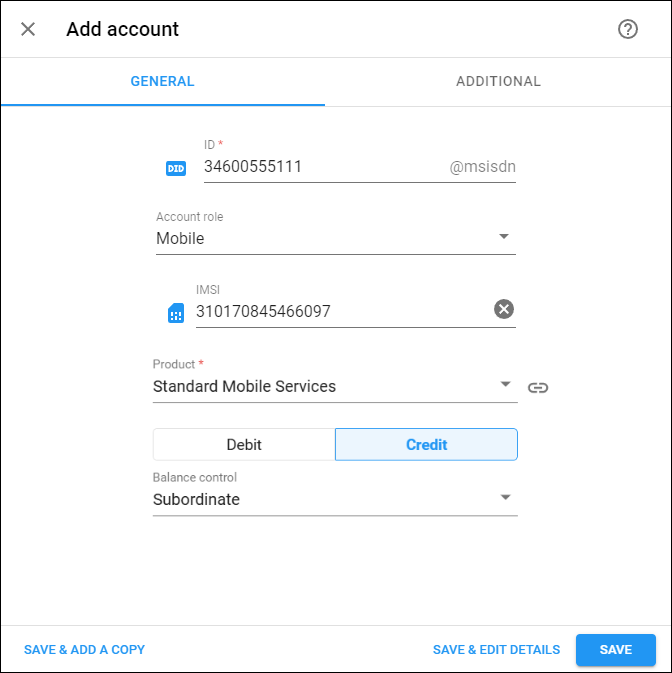
- ID – you can type in the user’s mobile phone number (MSISDN) manually or select it from the DID inventory.
- Account role – select Mobile.
- IMSI – click on IMSI icon and select one of the available SIM cards from the SIM Card Inventory dialog box.
- Product – select the “LTE Product” here.
- Activation date – the date from which the account is usable.
- Type – select Credit.
- Balance control – select Subordinate from the list (the account doesn’t have a separate balance – the customer’s prepaid balance will be used).
- Click Save to create an account.


