Centralized phone number list management for call screening
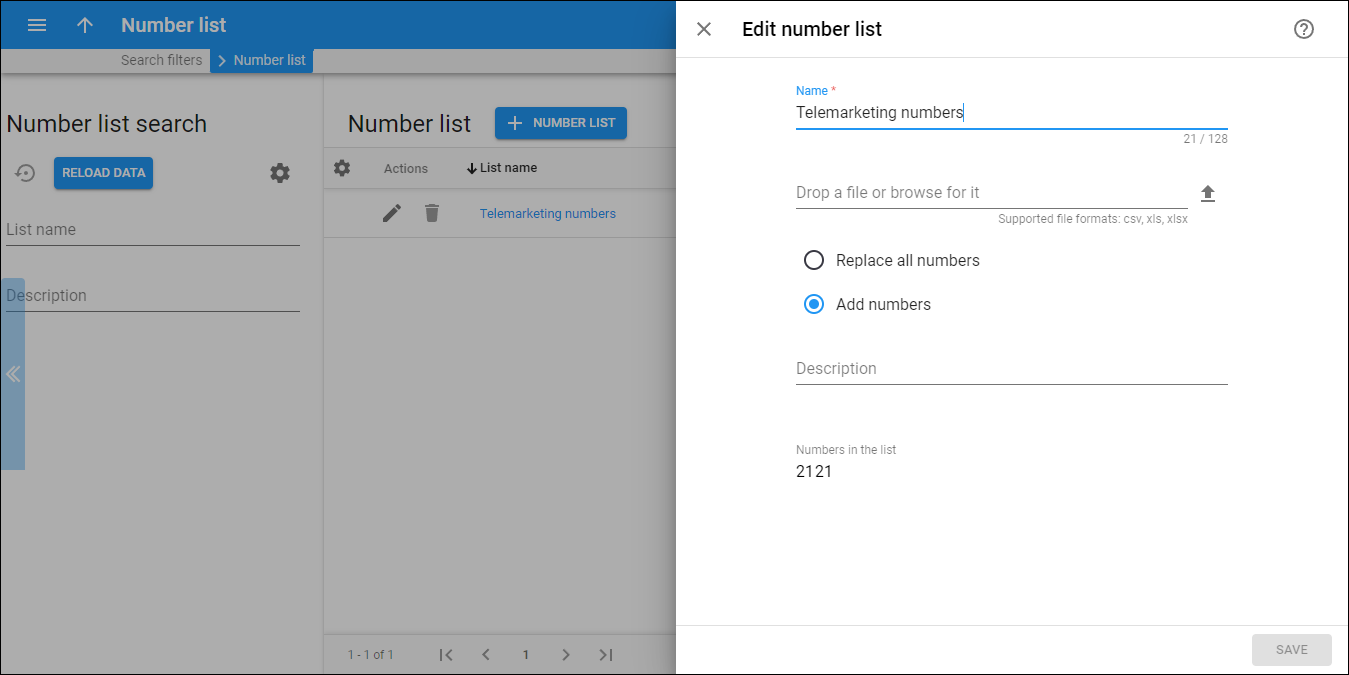
You can now create centralized lists of phone numbers, such as a list of telemarketers, to use for call screening configuration for any of your customers in the system. This saves tons of administration efforts, since the number list has to be updated only once.
Call screening rules include a condition, like “list of numbers from which calls originate,” and an action, such as “reject” or “send to voicemail.” Previously, these number lists were managed individually for each customer or account. Now, you can create a centralized list by uploading a file with the phone numbers in one place. This list is easy to keep up-to-date by reuploading the updated file. All customers will be able to use this most recent version of the number list in their call screening rules, ensuring accurate call management, such as blocking calls from all numbers known for telemarketing.
Suppose a service provider, “Owl Telecom,” periodically receives a file with the list of telemarketing numbers from the authority and needs to enable their customers to block calls from these numbers. The admin of “Owl Telecom” regularly uploads the updated file into the system, keeping the “Telemarketing numbers” list up-to-date.
“Owl Telecom” signs up a new customer “ABC Company.” The admin creates phone lines (accounts) for the customer, and configures call screening to prevent spam calls. The admin creates the same call screening rule called “Block spam” for each “ABC Company” account. As a condition of the rule, the admin selects the “Telemarketing numbers” list, and chooses the “Reject” action. As soon as the rule is enabled, calls from these numbers will be blocked and won’t bother the customer’s staff.
- Service providers can meet regulatory requirements related to filtering out spam calls for their customers.
- Admins can easily manage large lists of numbers for call screening in one place.
Specifics
- Number lists are managed within a specific virtual environment.
- The uploaded lists are automatically available to resellers’ customers, allowing them to use these lists in call screening rules.
- The possibility for users of the Cloud PBX Self-Care Portal to create call screening policies with rules based on the provided number lists will be added in the future.
- The number patterns cannot be added to the uploaded number lists.
- It is not possible to add, remove, or edit individual numbers directly within a list. To update a list, you need to re-upload it. You can choose whether the system should replace all existing numbers in the list or only add new numbers during the re-upload.
Role-based access to reseller portal for reseller staff
Resellers can now provide their employees with individual credentials and role-based permissions to access the reseller web portal. This new feature, called “reseller individuals”, is an enhanced replacement for the old web portal for resellers’ customer care (CC) staff. Resellers can now offer their staff a user-friendly portal with permissions tailored to their specific roles, such as “Helpdesk agent” or “Operations manager.” A required role must be preconfigured by the service provider and added to the list of “allowed roles” for the reseller.
Say your reseller needs to provide access to the customer data for two categories of team members:
- Helpdesk agent: Mary, a helpdesk agent, should be able to view customer data, including invoices and payment history, and trace sessions (e.g., view call details) to troubleshoot issues. However, she is not authorized to issue refunds or change products.
- Operations manager: Bob, operations manager, assists with general customer management, handles complaints, and addresses billing issues. He has broader permissions than Mary, including the authority to issue refunds within a specified daily limit and change products for a customer’s account.
To grant access to the reseller portal for Mary and Bob with the corresponding permissions:
- The reseller requests their service provider to enable the roles “Helpdesk agent” and “Operations manager” with the described permissions.
- The service provider creates two roles – “Helpdesk agent” and “Operations manager” – with the specified permissions and adds these roles to the list of allowed roles for the reseller.
- Reseller logs in to their portal and creates two reseller individuals:
Credentials are automatically sent to Mary and Bob via email, allowing them to log into the reseller portal with corresponding permissions.
- Resellers’ staff have access to a modern, user-friendly web interface that streamlines daily operations.
- Resellers can control access to their portal data.
- To set up a custom role, the service provider’s admin needs to create a role of the “Reseller” type and adjust its default permissions.
- For backward compatibility, the CC staff portal users will be automatically added as reseller individuals with their existing permissions that correspond to either of the default roles – “CC staff” or “Senior CC staff”:
- CC staff – this role allows portal users (“reseller individuals”) to view and manage customer data, except for invoices, credit card information, and information about linked main/branch offices if there are any. For instance, they can update customer contact details, change products for customers’ accounts and service settings.
- Senior CC staff – in addition to the permissions of the CC Staff role, this role allows creation of new customers, distributors, and accounts, view and modify customer credit card information, and manage the customer’s office hierarchy if they have main and branch offices.
- New passwords will be automatically generated for the CC staff portal users to access the reseller portal. Contact PortaOne Support to obtain the list of reseller individuals with their new passwords, so resellers can distribute these new passwords to their staff.
- You can allow resellers’ staff to keep access to the old CC staff portal. For this, set the RedirectCCStaffToResellerHost option to “No” on the Configuration server web interface. Note that new reseller individuals will not have access to the old portal.
See the configuration details here.
View failed call attempts via the “Trace session” troubleshooting tool
Admins can now easily find failed call attempts using the Trace session tool. This is useful for troubleshooting outgoing calls from a customer or inbound calls from a DID supplier that fail due to an incorrect username, password, or similar call authorization issues. Since no xDR records are produced for these rejected call attempts, there was no straightforward way to see specific PortaBilling log entries that detailed the exact reasons for authentication rejection.
Now, to locate unauthorized call attempts, admins need to open the Trace session page and specify the interval when this happened and they will see the list of all failed call attempts during that interval. They can view details and understand the reason for rejection and copy a unique call ID to share with colleagues or PortaOne Support for further investigation.
This enhancement helps admins troubleshoot incorrect configurations of customer equipment that result in unauthorized calls.
Improved clarity on vendor connections in session details
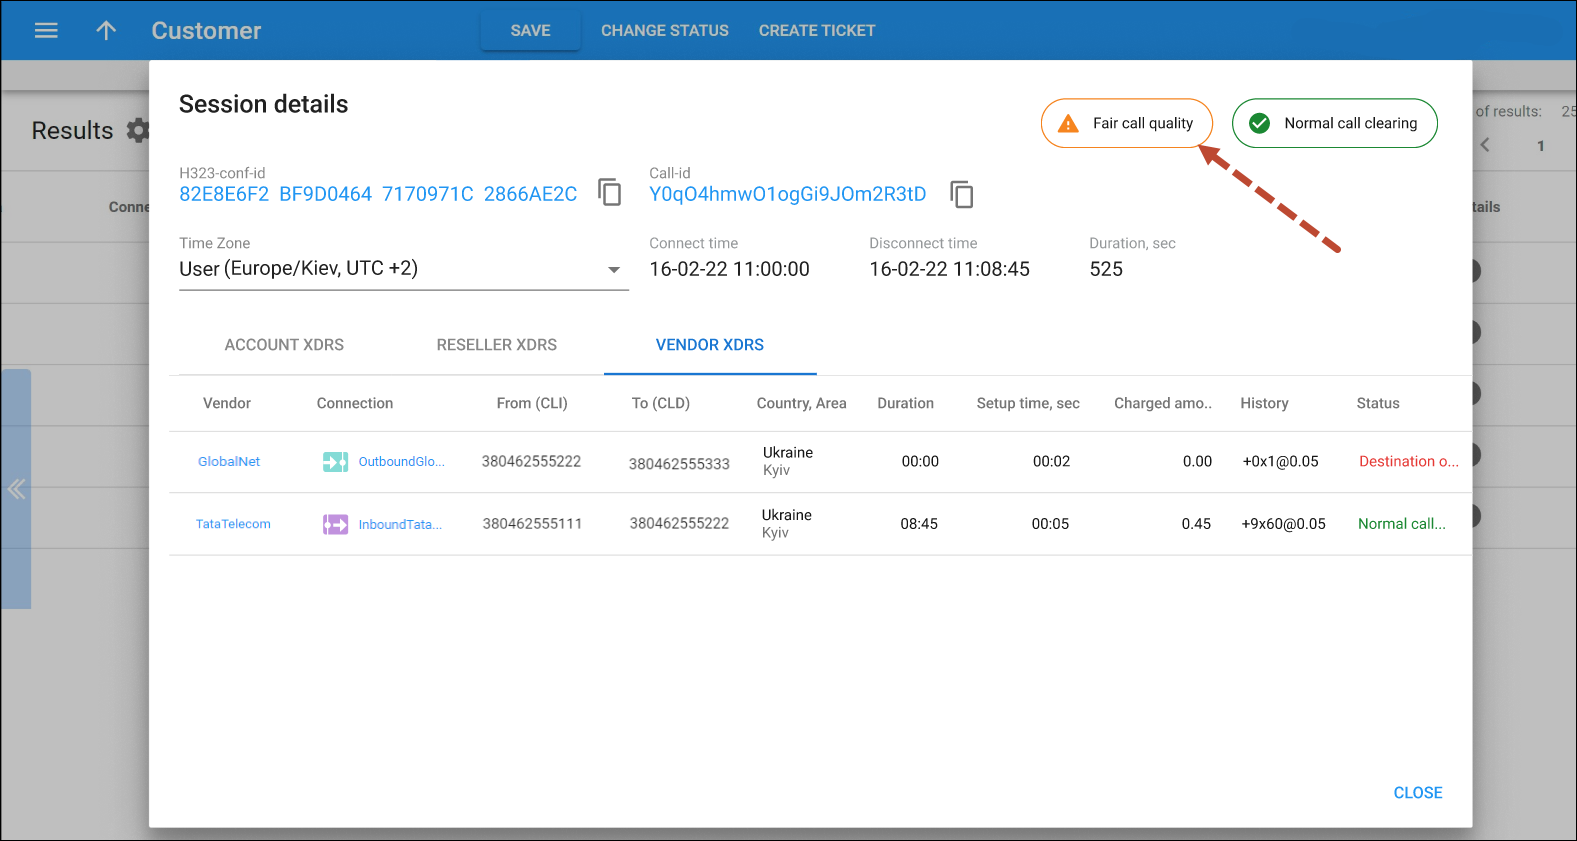
Admins can easily identify a specific vendor connection through which a call originated and where it was routed, which speeds up the troubleshooting. In the “Vendor xDRs” tab, the session details include specific icons in the “Connection” column to clearly show whether the connection is incoming or outgoing. Additionally, hovering over the connection reveals a tooltip displaying the full connection name and its direction – either “from vendor” or “to vendor” – as indicated by the icon.
This is useful for troubleshooting calls that involve both incoming and outgoing vendor connections, such as when a call to a customer’s DID is received from an outside vendor and then is forwarded to an external number. Say a customer of “Owl Telecom” reports an issue with a forwarded call, the admin needs to check the call flow and determine if the problem lies with Owl Telecom or with any of the vendors involved in the call.
Admins can save time on troubleshooting when both incoming and outgoing vendor connections are used for call processing.
Quick access to call quality details in the xDR list
This update provides admins with a more convenient way to access call quality information:
- Admins can now view call quality details, such as delay and packet loss for a specific call by clicking the “Call quality” icon in the xDR list.
- The call quality rating (e.g., “good,” “fair,” or “poor”) is now also visible in the “Session details” dialog.
Admins can easily and quickly monitor the quality of calls according to the configured metrics.
Detailed description of notification variables
Now, when the admin configures notification templates like “Invoice is overdue” for customers or users, they have a complete understanding of the variables that can be used in the text of the message (email or SMS), to be populated with the relevant data from PortaBilling, e.g., customer’s first name or the name of the product, in the actual outgoing message. Each variable now includes a detailed description to allow personalization, supply relevant details, and avoid mistakes when managing notification templates.
For instance, when the admin opens the Overdue balance variable details, they can thoroughly review the full description of the variable before adding it to the template.
Admis have the needed information on the notification variables one click away.


