Sometimes incoming calls need to be treated differently: calls from your boss or secretary should reach you on your cell phone, even during the weekend, while other calls can just go to voicemail. Calls from VIP clients in the evening hours should go straight to your cell phone since there is no point in ringing your IP phone when you are not in the office. Meanwhile, calls from your water supplier, who tends to call frequently during working hours for sales pitches, should go to voicemail so you can follow up on business matters at a convenient time.
All of this can be done using the call screening rules in PortaSwitch. When the call screening feature is enabled for an account (phone line), you can define a set of rules that will be applied to every incoming call. Each rule may include some of the following limitations:
- From – calling number condition. You can specify a list of phone numbers for a caller (ANI or CLI) which satisfy this condition, e.g., you can list extensions for your boss and secretary, your home phone, your wife’s cell phone number, and so on. When specifying a phone number, you can enter either the full number or a pattern (e.g., all numbers starting with 1800).
- To – called number condition. This can be useful if you have multiple account aliases (or DID numbers) forwarded to your main account. For instance, you may wish to treat incoming calls to your business toll-free number differently from calls to your regular phone number.
- Time Window – call time condition. You can specify limitations regarding the time of day, day of the week, day of the month, or some combination of these. This is ideal for making sure your phone will not ring in the middle of the night.
A rule may contain only some of these limitations (e.g., time), in which case the others will contain a wildcard (e.g., calls from any phone number, or made to any of your DID numbers).
Each rule provides instructions about exactly how a call should be processed. It contains a sequence of one or more of the following actions:
- Reject – simply drop the call without answering it.
- Ring – ring on the current IP phone.
- Forward – redirect to the numbers defined in the call forward/follow-me settings.
- Voicemail – connect the call to this phone’s voice mailbox.
When assigning an action to a rule, you will be offered a list containing all the possible combinations based on the currently available features for this account. For instance, the Forward option will be present only if the call forwarding service is currently enabled for the account.
Call screening algorithm
When a new call arrives to PortaSwitch, call information is sequentially checked against all defined call screening rules. The call information (ANI, DNIS, and current time) is checked against each rule’s limitations. If at least one of these does not match, the rule is skipped and processing moves on to the next one. If there is a match for all three limitations, then the rule’s actions are executed and no further rules are processed. If none of the rules matches (or if no call processing rules have been defined), then the default rule is applied, as follows:
- Ring on the IP phone.
- If not answered within a certain time (defined by the Timeout parameter in Service Features for the Voice Calls service), and if the account has call forwarding enabled, attempt to connect the call to the phone numbers listed there.
- If the call is still not answered and the account has the UM service enabled, forward the call to voicemail; otherwise drop the call.
Modes to handle incoming calls (business hours, non-working hours)
PBX users can use modes to control when and how calls come through to their line, and quickly change the way incoming calls are handled. For example, they can set their mode to accept calls during business hours, send all calls to voicemail at once during non-working hours, and forward calls to another colleague when on vacation. PBX users can change the mode for their extension by calling the IVR or on their self-care interface.
The PBX administrator can quickly change the way incoming calls are handled for all PBX extensions at once. Say the entire staff has to leave for a fire drill – the PBX administrator calls the IVR, and changes the mode from "Business hours" to "Emergency". Now, all incoming calls will be forwarded directly to mobile phones, and everyone who phones the office still receives assistance.
This is how it works:
Let’s say ABC company has three modes configured: "Business hours", "Non-working hours", and "Emergency". Each mode has a unique Dual-Tone Multi-Frequency (DTMF) code that is used for switching. Mary, a sales agent, goes out for business lunch (during business hours) and doesn’t want any calls to disturb her colleagues in the office. Thus, to forward all calls to voicemail at once, Mary dials *61 on her phone and specifies the DTMF code for "Non-working hours" mode. Once the mode is changed, Mary stops receiving calls, both from clients and other agents. All the calls are forwarded to voicemail. In two hours, Mary comes back to the office. She dials *61 on her phone again and changes the mode to business hours, meaning now she can receive calls.
- PBX users have more control over the incoming calls so that they can quickly change the modes to control what calls to accept.
- PBX administrators gain control over all incoming PBX calls. This allows for managing who can reach PBX users and at what time by quickly changing the way all incoming PBX calls are handled via IVR.
Policies
The policy contains a set of rules that define whether to play the response message (personalized audio message to play to callers before the call is answered) and what call action to apply (e.g., ring, forward, voicemail). A PBX customer may have several policies, e.g., a policy for each company department.
The PBX administrator can assign a policy to a specific account.
The order of rules matters. When the call arrives at PBX, PortaBilling checks the rules within the policy from top to bottom. The first rule that matches the call is applied, and the other rules are ignored. PortaBilling checks the rules with these parameters: caller/callee numbers (it can be a pattern, e.g., 2233%), period (time interval), mode of the called extension.
Modes
The Normal (Default) mode is present in the system. The DTMF code of the default mode is always zero (0). This DTMF code is used to switch to this mode. Users can switch from individual sticky mode to Normal (Default) mode to continue receiving calls according to the rules defined for the Normal (Default) mode.
The PBX administrator can set the following parameters for a mode:
- Dial DTMF to switch – this is a unique DTMF code of the mode. Users dial it to switch to this mode. Digits from 1 to 9 are available.
- Timeout, minutes – this is mode duration in minutes, after which the mode automatically switches to Normal (Default) mode. For example, there is a "Meeting" mode with 60 min timeout. If Mary switches to "Meeting" mode at 3 p.m, the mode switches to Normal (Default) mode at 4 p.m.
- Sticky mode for individual use – if the mode is marked sticky, only extensions can set this mode. If the PBX administrator switches all the extensions to the other mode, this change doesn’t influence the extensions with sticky mode. These extensions remain in this mode until they change it via IVR or their self-care interface, or sticky mode’s timeout ends.
Let’s say John Doe changes the mode from Normal (Default) to "Vacation" (all calls are forwarded to the other PBX extension) on their self-care interface. Later, the PBX administrator changes the mode for all PBX extensions to "Emergency" (calls are forwarded to the mobile phone). Despite this change, all incoming calls to John are handled according to vacation mode. Thus, when Mary calls John, the following happens:
- first, the call is forwarded to the extension of John’s colleague, Ann, (according to "Vacation" mode), and
- then the call is forwarded to Ann’s mobile phone (according to "Emergency" mode).
The PBX administrator can see all the modes and their configuration.
Personalized response messages for incoming calls
PBX users can record a personalized audio message to play to their callers before the call is answered, forwarded, or redirected to voicemail. This allows PBX users to give a caller additional information, for example, that the call is being recorded.
Let's say Mary Smith goes on vacation from August 1 and wants to record a personalized message to play when somebody calls her. Beforehand, the PBX administrator has to set several call processing modes: "Business hours", "Non-working hours" modes, and a "Vacation" mode for the users who go on vacation.
To switch from "Business hours" to "Vacation" mode, Mary dials *61 on her IP phone. Then she follows the voice-recorded instructions to record a personalized message: "I’m on vacation till August 5. Your call will be forwarded to my colleague, Ann". When John Doe, a client, calls Mary on August 3, he hears the message in full, and only then the call is forwarded to Ann’s phone. Ann picks up the call and talks to John. When Mary comes back to work on August 6, she calls the IVR (*61) again and dials a code that switches her phone line back to "Business hours" mode.
The message, added by the user, always overrides the default message added by the PBX administrator, no matter whether it is recorded via the IVR or uploaded via the self-care interface. The audio message can be in .wav, .mp3, .og, or .au format and don’t exceed the size of 3 MB.
To add the personalized message to a specific mode via self-care interface, the PBX users have to:
- Upload an audio file to the self-care interface:
- Go to the account self-care interface > Cloud PBX > Call screening > Response messages.
- Click Browse, choose the file from PC, and click Upload. The name of the file automatically appears in the Description field.
- Add an audio file to the mode:
- Open Cloud PBX > Call screening > Modes.
- Click Edit, select a specific mode from the drop-down menu, and afterward select the Temporary response message.
PBX administrators can also add a default message that applies to all PBX extensions, both via a customer self-care interface and by calling the IVR. Make sure that the PBX management feature is enabled for this extension. To do it, go to the PortaBilling interface, open the Account > Services > Service configuration > Voice calls > Incoming calls > Call screening, and enable the PBX manager toggle switch.
PortaBilling administrator can upload a default message on the PortaBilling web interface:
- For the customer: The administrator can upload a default message that will apply to all PBX extensions that have a specific mode, except those extensions that set their own personalized message. To add a default message, the administrator goes to the Response messages tab and uploads a file.
_solution/Uploading%20a%20response%20message%20to%20the%20customer.png) The administrator can also choose how to store the response message file:
The administrator can also choose how to store the response message file:
- Permanent — the file is stored until the administrator deletes it;
- Temporary — the file is stored for 1 day and automatically deleted afterward if not used.
Afterward, to add the default message to the mode, the administrator goes to the Policies tab, adds a rule to the specific policy, selects the mode, and chooses the audio file in the Response message drop-down list.
- For a specific account: Personalized messages can be applied to each of the accounts separately. The administrator has to upload the file in the Response messages tab and afterward add it to the mode via the rule in the Rules tab. The file uploaded to the account Response messages list will appear on the account self-care portal.
_solution/Adding%20a%20response%20message%20to%20the%20mode.png)
Default service codes to change response messages:
- *62 - PBX management default code. When called, the response message for all accounts of a certain customer changes.
- *61 - individual management default code. When called, the response message for a single account changes.
You can change the default service codes by creating a new dialing rule for the customer.
PBX users can provide better service to their clients with informative audio messages.
Configuration
Let's say ABC company wants to configure three modes for their PBX extensions:
- Business hours – to accept all calls from 9 a.m. till 6 p.m.
- Non-working hours – to forward calls to voicemail.
- Vacation – this is a sticky mode per individual use only. Users can enable it during vacation. All calls will be forwarded to the other PBX extension/phone number.
To configure the call handling for ABC company, the administrator performs the following steps:
- Enable Call screening feature on the product:
- Configure a policy to handle incoming calls:
- Open Customer > Services > Call screening > Modes tab.
_solution/Add%20modes%20on%20customer.png)
- Click Add to create a new mode:
- Business hours – select 1 as a DTMF code.
- Non-working hours – select 2 as a DTMF code.
- Vacation – select 9 as a DTMF code, select the Sticky checkbox so that only PBX users can use this mode.
All the modes appear on the interface.
- Go to Time filters tab, click Add to create a new filter:
- Go to Policies tab > Add Policy > Add rule.
- Create three rules specifying a period, response message and actions such as ring, forward, voicemail, etc.
- Rearrange the rules so that "Vacation" mode becomes the first rule.
_solution/Order%20of%20rules%20within%20policy.png)
- Open Customer > Services > Call screening > Modes tab.
- Apply the policy to every account so that they can use the predefined modes:
By default, *61 is the prefix for changing mode for a specific extension and *62 for changing the mode for all PBX extensions at once (PBX manager option must be enabled for the account). It’s possible to change the default prefixes by creating a new dialing rule.
Centralized phone number list management for call screening
You can now create centralized lists of phone numbers, such as a list of telemarketers, to use for call screening configuration for any of your customers in the system. This saves tons of administration efforts, since the number list has to be updated only once.
Call screening rules include a condition, like “list of numbers from which calls originate,” and an action, such as “reject” or “send to voicemail.” Previously, these number lists were managed individually for each customer or account. Now, you can create a centralized list by uploading a file with the phone numbers in one place. This list is easy to keep up-to-date by reuploading the updated file. All customers will be able to use this most recent version of the number list in their call screening rules, ensuring accurate call management, such as blocking calls from all numbers known for telemarketing.
Suppose a service provider, "Owl Telecom," periodically receives a file with the list of telemarketing numbers from the authority and needs to enable their customers to block calls from these numbers. The admin of "Owl Telecom" regularly uploads the updated file into the system, keeping the “Telemarketing numbers” list up-to-date.
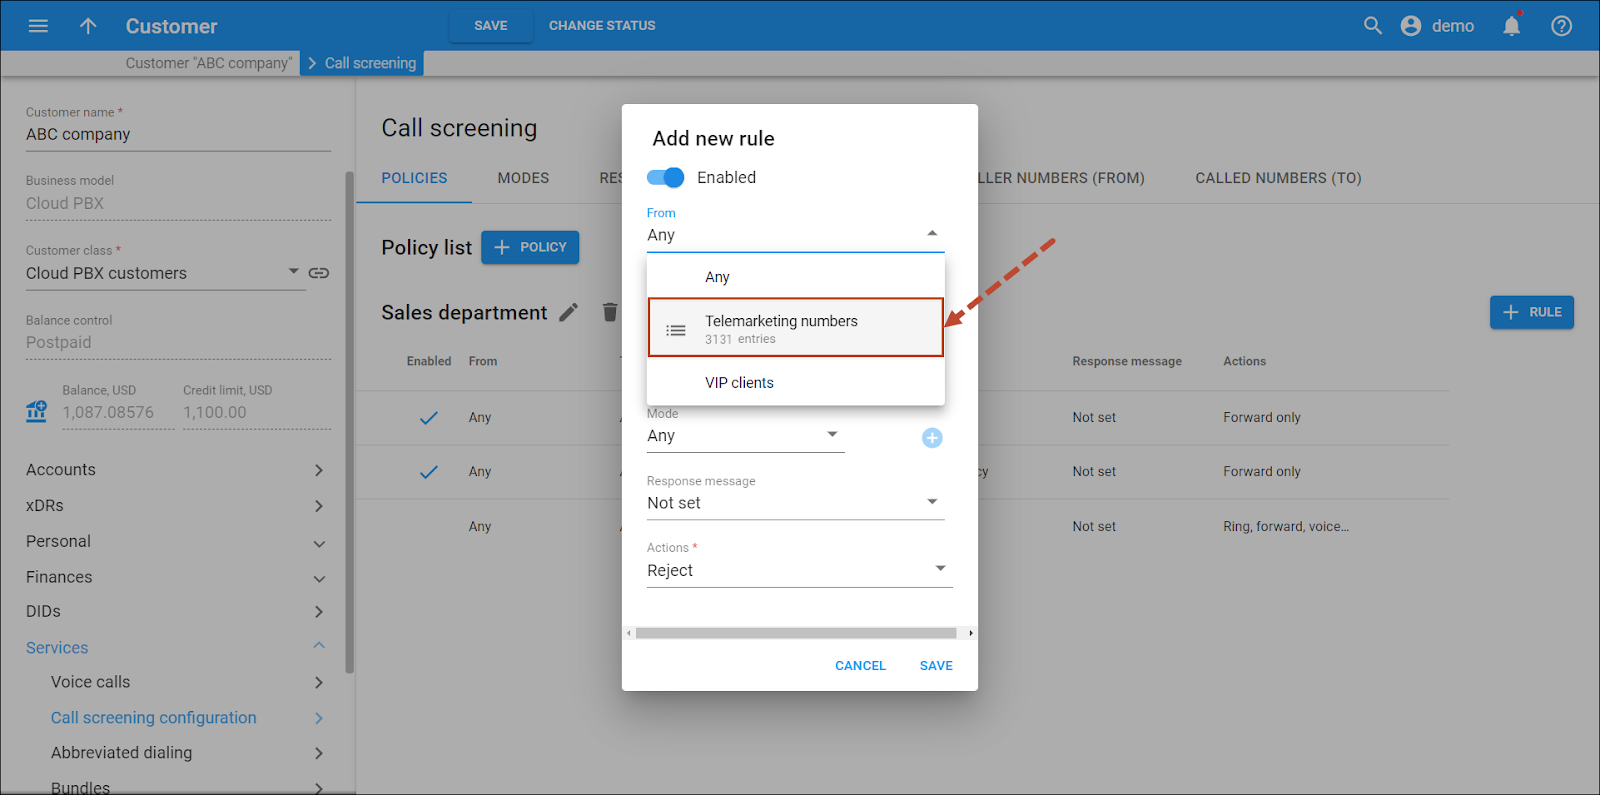
"Owl Telecom" signs up a new customer "ABC Company." The admin creates phone lines (accounts) for the customer, and configures call screening to prevent spam calls. The admin creates the same call screening rule called “Block spam” for each “ABC Company” account. As a condition of the rule, the admin selects the “Telemarketing numbers” list, and chooses the “Reject” action. As soon as the rule is enabled, calls from these numbers will be blocked and won’t bother the customer’s staff.
- Service providers can meet regulatory requirements related to filtering out spam calls for their customers.
- Admins can easily manage large lists of numbers for call screening in one place.
Specifics
- Number lists are managed within a specific virtual environment.
- The uploaded lists are automatically available to resellers’ customers, allowing them to use these lists in call screening rules.
- The possibility for users of the Cloud PBX Self-Care Portal to create call screening policies with rules based on the provided number lists will be added in the future.
- The number patterns cannot be added to the uploaded number lists.
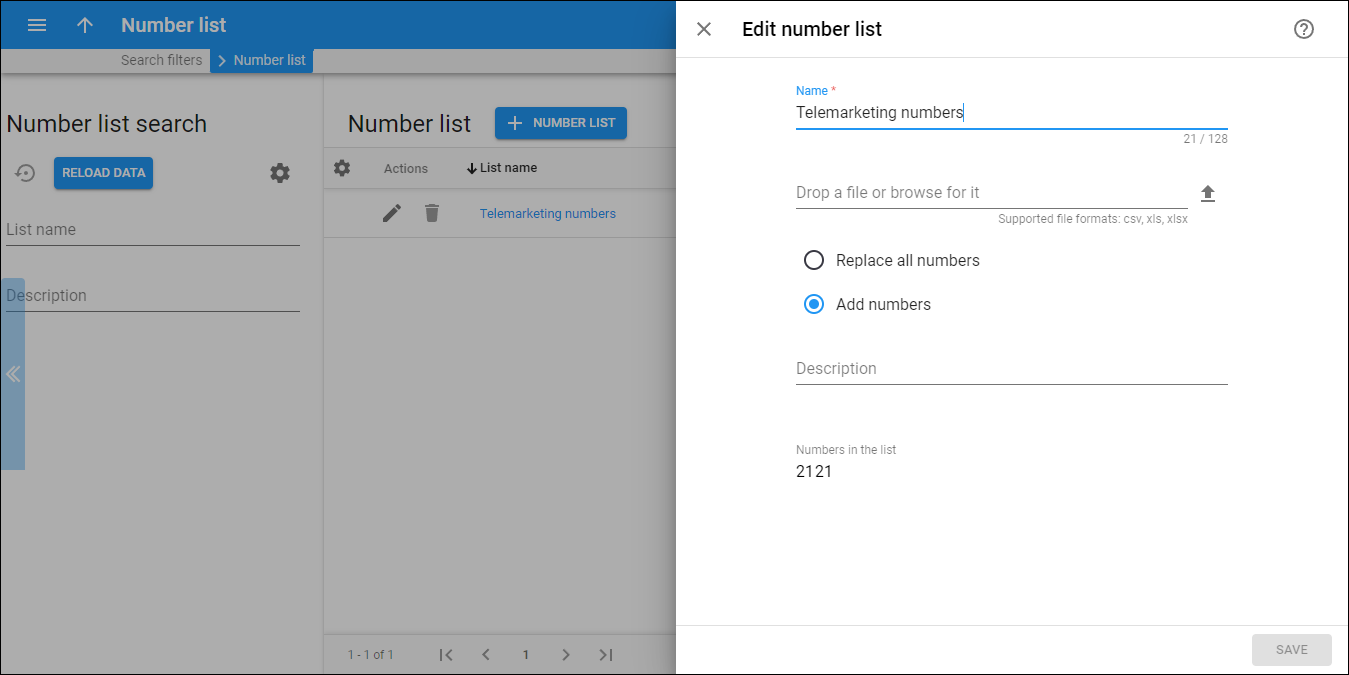
- It is not possible to add, remove, or edit individual numbers directly within a list. To update a list, you need to re-upload it. You can choose whether the system should replace all existing numbers in the list or only add new numbers during the re-upload.
Configuration
To create a centralized list of phone numbers:
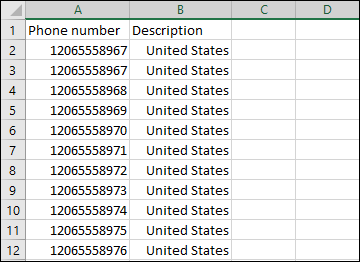
- Prepare a file in the .csv, .xls, or .xlsx format. The first column should contain the phone numbers. Optionally, add the number descriptions in the second column. Note that after upload, neither the numbers nor the descriptions will be visible in the PortaBilling web interface.
- Add a new number list:
- Navigate to Voice calls processing > Number list
- Click Add
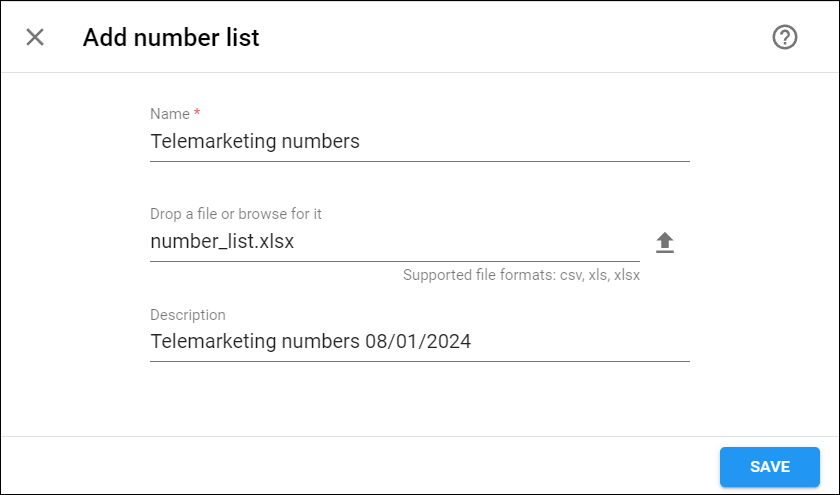
 and fill in the details:
- Name – specify the list name, e.g., “Telemarketing numbers.” This name will automatically appear as a “From” option when configuring conditions for a call screening rule.
- Drop a file or browse for it – drop a file here or click Browse
 to locate it. Select a file in one of the supported formats: .csv, .xls, or .xlsx.
 - Description – optionally, add a description for the number list.
- Click Save.
To update a centralized list of phone numbers, navigate to Voice calls processing > Number list, click Edit for the needed list, and reupload the updated file in the dialog that opens. During the reupload, you can choose either the “Replace all numbers” or “Add numbers” option.
To use a centralized phone number list in any call screening rule, whether it's created within a customer-level call screening policy or directly at the account level. Simply select the desired number list in the "From" dropdown, select the corresponding “Action,” such as “Reject,” and save the rule.


_solution/Call%20screening%20policy.png)
_solution/Default%20extension%20mode.png)
_solution/Sticky%20mode.png)
_solution/Modes%20configuration.png)
_solution/Uploadin%20response%20message%20via%20the%20account%20self-care%20portal.png)
_solution/Adding%20the%20response%20message%20to%20the%20mode%20via%20account%20self-care.png)
_solution/Activating%20the%20PBX%20manager%20toggle.png)
_solution/Adding%20the%20response%20message%20to%20the%20mode.png)
_solution/Service%20codes%20panel.png)
_solution/Enable%20call%20screening%20on%20the%20product.png)
_solution/Set%20code%20to%20switch%20the%20mode.png)
_solution/Created%20modes.png)
_solution/Add%20time%20filters%20for%20a%20mode.png)
_solution/Apply%20policy%20to%20the%20account.png)


