… Charge separately for different call legs for ANI callback
Let’s say you only want to allow your customers from the UK and Ireland to initiate callbacks. This can be done by setting up separate charging for different call legs and restricting the destinations in the call legA tariff to destinations in the UK and Ireland.
- Edit the Accounting section of the Callback calling application:
- Create tariffs that will be used for separately charging for different call legs following the instructions described in the previous chapters.
- Enter rates to the tariffs:
- Modify the callback product:
- On the Usage charges panel add a new rating entry with your PortaSIP node, the tariff that will be used for charging for call legA and the access code in this format: <LegA CLD Prefix> + <Access number> (e.g., 123#18882325698);
- Add another rating entry with your PortaSIP node, the tariff that will be used for charging call legB and the access code in the format <LegB CLD Prefix> + <Access number> (e.g., 456#18882325698).
… Charge separately for different call legs for WEB and Email callback
- Perform steps 1-3 as described in the section above.
- Modify the callback product:
- On the Usage charges panel add a new rating entry with your PortaSIP node, the tariff that will be used for charging for call legA and the access code in the format <LegA CLD Prefix> + <Access Code> (e.g., 123#WEBCALLBACK);
- On the Usage charges panel add a new rating entry with your PortaSIP node, the tariff that will be used for charging call leg A and the access code in this format: <LegB CLD Prefix> + <Access Code> (e.g., 456#WEBCALLBACK).
… Simply match multiple access numbers to a tariff for call leg charging
This option allows you to apply a single tariff to charge users for calls made to their numbers (call leg A) from multiple access numbers (e.g., if you provide DNIS callback), and to apply another tariff to charge users for calls to destination numbers (call leg B).
To match all access numbers to corresponding tariffs in the product, do the following:
- Configure the callback services as described in the Setting up callback services handbook.
- Configure the LegA CLD Prefix and LegB CLD Prefix of the Callback calling IVR applications and then perform further tariff and product configurations. To do this, follow the instructions described in the …Configure separate charge for incoming leg chapter in the How to… handbook of the Prepaid services section.
… Configure brand prompts
You may want to greet your end users or guide them through the IVR application once they have dialed the access number. Brand prompts is the audio tool that helps you reach this goal.
To configure custom brand prompts, perform all of the following steps:
- Record a voice prompt, e.g., welcome message, in the .wav, .mp3, .mp4, or .m4a format. Give the prompt a proper name that corresponds to the prompt type, e.g., “welcome.mp3” for a welcome message.
- Copy the prompt file to your PortaSwitch server, e.g., to the /porta_var/tmp folder.
- Log in to a processing node via SSH.
- Convert the prompt into the .au and .g729 formats using the PortaOne converter – prompt_converter.pl.
For this, run the following command:
/home/porta-um/scripts/prompt_converter.pl --timeout 14 --config /etc/porta-one/psmsc/periodic–tasks–<SIP_IP>.conf --debug <file_name>
where file_name is the name of the file, and SIP_IP is the IP of the corresponding sip mu-bundle on your PortaSwitch server.
ExampleThe file name: welcome.mp3
The SIP IP: 111.111.11.112
The command:
/home/porta-um/scripts/prompt_converter.pl --timeout 14 --config /etc/porta-one/psmsc/periodic-tasks-111.111.11.112.conf --debug welcome.mp3
You can also convert all files on the server of the .mp3 format at once. Specify “*” as the file name, e.g., *.mp3 will convert all files in the .mp3 format.
- After the conversion, you need to change the prompt names using the following command:
rename 'new_' '' *.au *.g729
ExampleThe file names after the conversion: new_welcome.au and new_welcome.g729
The command:
rename 'new_' '' *.au *.g729
The file names after applying the command: welcome.au and welcome.g729
- Create new folders to place the brand prompts there. For this, run the following commands:
mkdir /porta_var/psmsc/custom-files/prompts/brands/<your_custom_name>
mkdir /porta_var/psmsc/custom-files/prompts/brands/<your_custom_name><language>
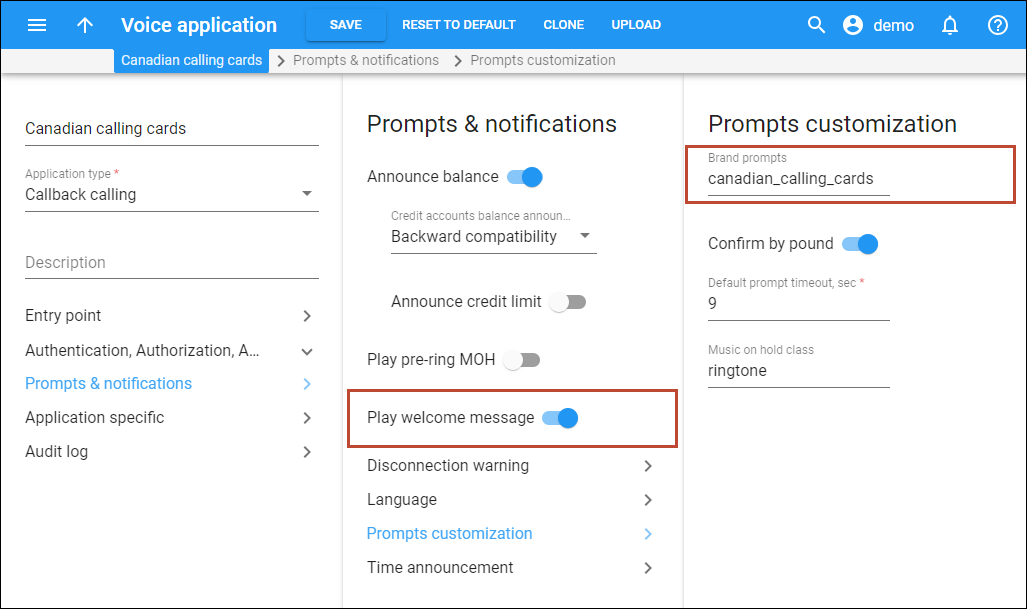
where <your_custom_name> is the name of the folder for your custom prompts. The same folder name should be specified in the Brand prompts field of a voice application settings in step 9.
Instead of the <language> for the second folder, use the two-letter code of the language the prompts are recorded in.
ExampleIf the folder name is canadian_calling_cards and the prompt language is English, then the command will be:
mkdir /porta_var/psmsc/custom-files/prompts/brands/canadian_calling_cards

mkdir /porta_var/psmsc/custom-files/prompts/brands/canadian_calling_cards/en
- Place the brand prompts in the newly created <your_custom_name>/<language> folder by using the following commands:
mv <required file name>.au /porta_var/psmsc/custom-files/prompts/brands/<your_custom_name>/<language>

mv <required file name>.g729 /porta_var/psmsc/custom-files/prompts/brands/<your_custom_name>/<language>
ExampleFor the canadian_calling_cards folder and English as the prompts language, the command will be:
mv welcome.au /porta_var/psmsc/custom-files/prompts/brands/canadian_calling_cards/en

mv welcome.g729 /porta_var/psmsc/custom-files/prompts/brands/canadian_calling_cards/en
If you want to move all the files of a specific format at once to a needed folder, then use *.au and *.g279 instead of the file names. So the commands will be:
mv *.au /porta_var/psmsc/custom-files/prompts/brands/canadian_calling_cards/en

mv *.g729 /porta_var/psmsc/custom-files/prompts/brands/canadian_calling_cards/en
- Repeat steps 1-7 for each processing node of the installation.
- Configure the brand prompts on the Voice applications page of the web interface.


