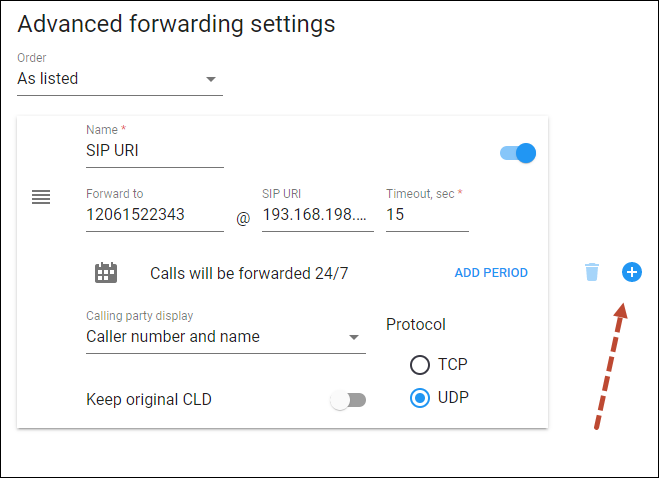
On this panel, you can specify phone numbers for advanced call forwarding and configure the forwarding parameters.
Each entry in the forwarded list is created as active.
Order
Specify the order for redirecting a call:
- As listed – try every active forwarding number from the first (topmost) number to the last, until the call is answered.
To change the number order in the list, select a specific forwarding number using Reorder
and drag it up or down.
- Random – try numbers in random order.
- Simultaneous – call all active forwarding numbers from the list at the same time until the call is answered.
- Percentage split – try numbers based on the percentage specified.
Percentage %
This field is only available when a Percentage list order is selected.
It shows the percentage of calls that PortaSwitch sends to a specific number. Note that the total percentage for all numbers in the advanced forwarding list should be 100%. When you add the new forwarding number, it has 0% set by default.
Note that when the Percentage list order is selected, you can delete a forwarding number only when the percentage value of the remaining numbers on the list equals 100. For example, if you have 3 forwarding numbers with the following percentages: 50% to 18005558901, 15% to 18005558902, and 35% to 18005558903, and need to delete 18005558902, do the following:
- delete the 18005558902 number;
- change the percentage values for the remaining numbers so that their total percentage equals 100 (e.g., 60% to 18005558901, 40% to 18005558903); and
- save the changes.
Name
The name of the forwarding number, e.g., “mobile phone”.
Forward to
Specify a phone number to forward calls to. It will be translated according to the customer’s dialing rules.
SIP URI
An end user can enter a forwarding destination as a CLD@IP or CLD@domain. PortaSIP will round-robin through the DNS SRV records if they are configured for a specific domain.
Timeout
Specify how much time to wait, in seconds, until a call is answered. After the timeout, the call is either redirected to the next forwarding number or disconnected.
Add time periods
Define the period when it’s allowed to send calls to a specified number. By default, the calls are forwarded to this number 24/7.
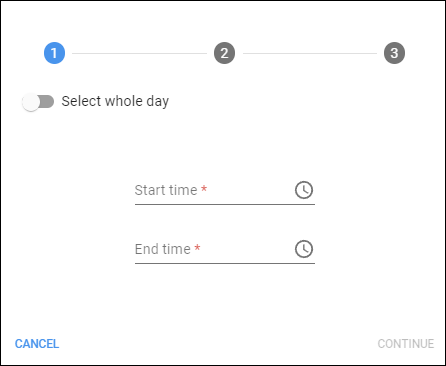
To set a specific period, click Add period and specify the period details in the dialog that opens:
- Time – define the time for the period:
- Start time – define the exact time when the period starts.
- End time – define the exact time when the period ends.
If you want the period to take the whole day, turn on the Select whole day toggle. Click Continue to proceed.
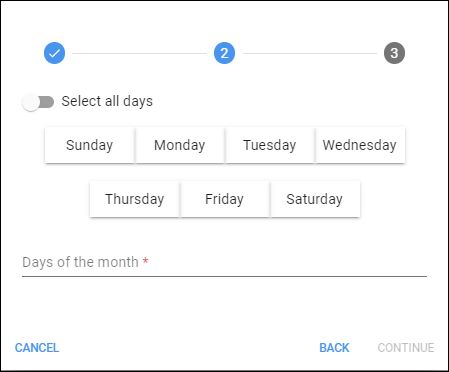
- Days – define the days of the week and/or of the month for the period:
- Days of the week – click on the specific days of the week to add them to the period.
- Days of the month – specify days of the month as comma-separated values, e.g., 1, 4, 5. To add a day’s period, specify the values separated by dashes, e.g., 15-30.
If you want the period to cover the whole month (all days), turn on the Select all days toggle.
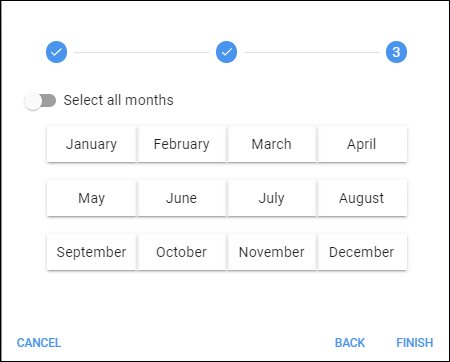
- Months – click the names of the months you want to add to the period. If you want the period to cover all months of the year, turn on the Select all months toggle.
- Click Finish to save the period configuration.
To delete the period, click Delete . To change the period, click Edit
.
To add more periods, click Add ![]() and specify the details in the dialog that opens.
and specify the details in the dialog that opens.
Calling party display
Choose how to display a caller’s info during forwarding:
- Caller number and name – the call is forwarded with the phone number and the name of the original caller (e.g., if A calls B, but the call is forwarded to C, C will see that it is A who is calling).
- Caller number and forwarder name – the phone number of the caller and the forwarder name are put into the CLI of the forwarded call (e.g. if A calls B, but the call is forwarded to C, C will see A’s phone number and B’s name).
- Forwarder number and name – the call is forwarded with the phone number and the name of the forwarder (if A calls B, but the call is forwarded to C, C will see that it is B who is calling).
Protocol
Choose the UDP or TCP transport protocol. For PBXes that do not support UDP, use the TCP protocol instead of UDP for SIP communications.
Keep original CLD
With this option, preserve the original dialed number during forwarding. This is useful for forwarding a call to a remote PBX.
How to add a new forwarding number
To add a new forwarding number, click Add .
How to disable forwarding to a specific number
To temporarily disable forwarding to a specific number, turn off the toggle near a specific number.
How to a delete forwarding number
To delete a forwarding number, click Delete . Note that at least one number should be left.


