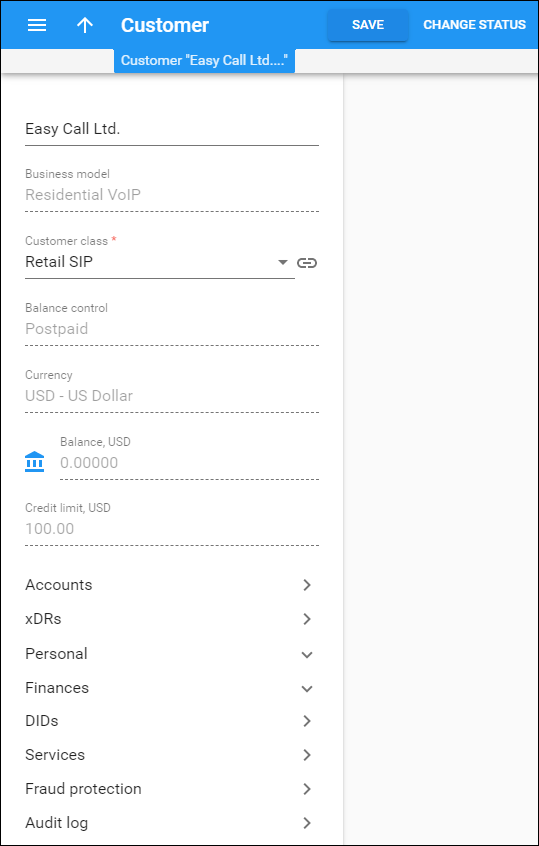
On this panel you can change customer details. Note that some fields are read-only. To save the changes, click Save.
Status
Status shows if this customer can use the service and to what extent. Depending on the status, a customer has full, restricted or no access to the service.
The status icon shows the customer’s status. No icon means the customer is active and services are available.
Change status
A status change is triggered by specific events, e.g., a customer has exceeded the credit limit.
You can also assign some statuses manually. To change a status, click Change status. The Customer change status window opens where you can:
- View the current status.
- Change the status to blocked, provisionally terminated and/or permanently terminated.
When you change the customer status to “Provisionally terminated”, the date of the permanent termination is calculated automatically based on the value in the Permanently terminate customers after the provisional termination option (by default, 30 days). You can manually set an earlier date for permanent termination.
- Remove customer’s personal data from the system completely. Thus you comply with the GDPR requirements for personal data processing. Schedule personal data removal to happen immediately upon customer termination or after the specified storage period (e.g., to keep personal data until the limitation period expires.)
- Restore the customer from being blocked, provisionally terminated or exported.
- Lift the suspension until the defined date.
- Initiate invoice generation.
- View a list of scheduled changes.
Click Change when you are done.
A customer’s status can change automatically.
Business model
This is the business model chosen for the customer. It defines which type of service the customer uses (for example, hosted IP PBX, Internet access, etc.).
You aren’t allowed to change the business model for saved customers.
Customer class
This is the customer class chosen for the customer.
A customer class defines a set of parameters shared among a certain category of customers. For example, you can create two separate classes – one for retail customers and another for business customers, plus define the relevant parameters for each class. After that, you only need to assign the required customer class to all customers of a given category to ensure that all of them have the same parameters (such as grace period, invoice template, taxation, notification list, etc.).
To change a customer class, select a new one from the list. Note that all current settings and the custom data will be lost.
Click Show to open the customer class details. Note that your changes to the customer class apply to all customers in this customer class.
Balance control
This is the customer’s balance model. It is either prepaid – a customer pays for services in advance or postpaid – a customer pays at the end of the billing period.
You aren’t allowed to change the customer’s balance model for saved customers.
Currency
This is the currency that a customer is charged in.
You aren’t allowed to change the currency for saved customers.
Balance
This is the customer’s current balance (only for postpaid customers).
To adjust the customer’s balance, click Balance adjustment and follow the steps in the Balance adjustment wizard that opens.
Available funds
This is the amount of customer’s available funds (only for prepaid customers).
Credit limit
This is the credit limit set for the customer (only for postpaid customers). When the customer’s balance reaches that credit limit, this customer is no longer allowed to use the services. Mandatory custom field(s) with the additional information about the customer.
Accounts
The Accounts section leads you to a group of panels where you can manage this customer’s accounts.
Personal
The Personal section provides access to a group of panels that allows you to define a customer’s personal information, configure customer sites, create pricing batches for DID numbers, and create customer accounts.
General info
On the General info panel you can define such personal information about the customer as name, email address and contact (the person to contact instead of or in addition to the customer).
By default, PortaBilling automatically adds the customer’s first name to the Contact field.
The links below lead you to the panels where you define the customer’s address, web self-care credentials, sales agents, DID pricing batch and other information.
Batch search
On the Batches panel you can filter for customer’s batches and add new ones.
Finances
The Finances section provides access to a group of panels that allows you to check the customer current balance, monitor the customer charge attempts, view the customer xDRs, and get information about the customer service wallets.
General info
On the General info panel you can define such personal information about the customer as name, email address and contact (the person to contact instead of or in addition to the customer).
E-payments search
Here you can filter your customer’s payment transactions and browse their transaction history.
Invoices and taxation
On the Invoices and taxation panel you can define which invoice template to use and how to enumerate the invoices, how to tax the customer for provided services, and whether to send statistics and invoices by email.
DIDs
The DIDs section provides full information about the DID numbers assigned to this customer.
Services
On the Services panel you can define the configuration settings for services provided to this customer.
Fraud protection
On the Fraud protection panel you can choose which fraud protection tools to use for this customer.
Audit log
On the Audit log panel you can track and browse changes made to this customer record.


