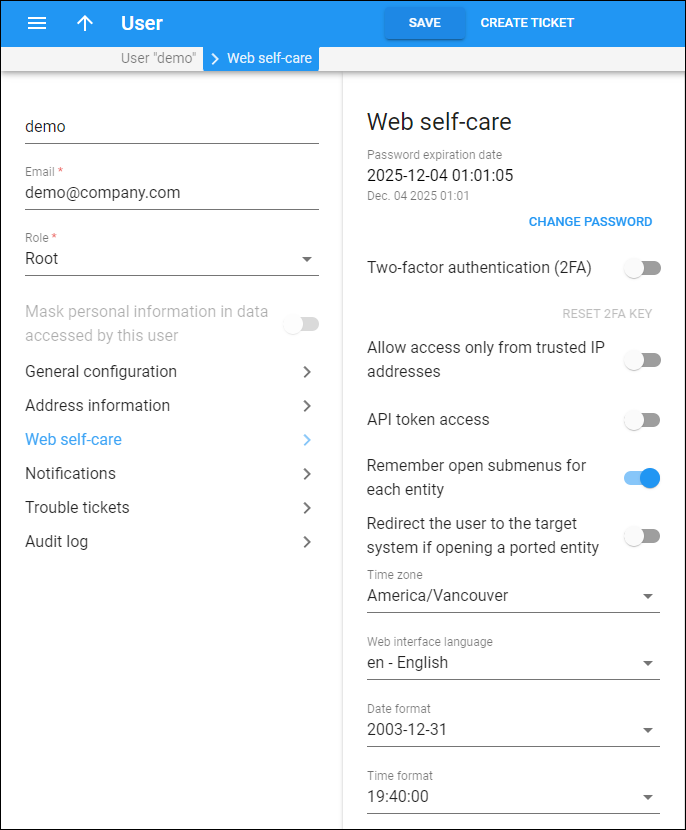
Password expiration date
This field shows the date and time when the current password expires, which means that the user will be asked to create a new password when logging in.
The expiration date is set once the user logs in with a new password for the first time. By default, all web interface passwords that are used for logging in expire in 30 days. See the Password protection section for more details.
How to change your own password
To change the password:
- Click Change password.
- Specify the details in the dialog that opens:
- The current password.
- The new password. Note that by default, it must contain Latin letters and decimal digits, and can include special characters. Refer to the Requirements for password complexity section for more details. To generate the new password automatically, click Generate password
.
- Confirm the new password.
- Click Proceed.
To show or hide the passwords, click Show password or Hide password
.
How to reset the other user’s password
A user with the “Root” role can reset the other users’ passwords, e.g., if they have forgotten it. To reset the password for a user, click Reset password, and click Reset to confirm. The new password is automatically copied to the clipboard. Note that the user will need to change this new password when logging in the first time.
Two-factor authentication (2FA)
Turn on this toggle to enable 2FA, so the user will be able to log in to the system only after entering a one-time password (OTP) in addition to their login and regular password. The OTP is generated by a 2FA application installed on the user’s smartphone, e.g., Google Authenticator.
If a user loses access to the 2FA application, click Reset 2FA key.
Allow access only from trusted IP addresses
Enable this option to allow access to the PortaBilling web interface only from IP addresses that you define in the Allowed IP address/network field. If a user tries to log in from outside of your network, PortaBilling denies their access and the user cannot log in. Click the Add to add more than one IP address or network.
API token access
Enable this option to use tokens instead of standard login-password pairs for authenticating your applications integrated with PortaBilling via the API. Input the combination from the API token field into your application and remove the password from it (the AuthInfoStructure and LoginRequest API structures have the token property). Click the Generate token to generate a new token.
Remember open submenus for each entity
If this option is enabled, this means that when you navigate between entities of a specific type such as accounts, you will be automatically directed to the last opened panel (submenu) for that entity type. For example, if you open the “Web self-care” panel within an account, the same panel will automatically open when you access any other account in PortaBilling.
Redirect the user to the target system if opening a ported entity
Enable this option so that once the user opens a customer/account which was exported to the target system, this user will be automatically redirected there.
Time zone
Choose a time zone in which this user will operate.
Web interface language
Choose a language to be used on the administrator interface for this user.
Date format
Choose a format for the shown date.
Time format
Choose a format for the shown time.


